Thursday 20 December 2012

Christmas decorations

Christmas is a time of tradition.  Watching the Snowman, making biscuits for the tree, shouting "oh no it isn't" at the panto; we all have our own.  A few years ago I started a new tradition of my own of making felt Christmas tree decorations for family and friends.  It's the perfect Christmas project - planning and making the decorations gets me in a festive mood, I love how pleased everyone seems to be when I give them their decoration and I get to do some sewing.


Over the past few years I've made hearts, robins and stars (very tricky).  This year was the turn of the Christmas pudding, adorned with holly leaves and buttons for berries.  They are simple to make, so I thought I would share.

You will need the following templates:

My pudding template measured 4"x 3" approx, but you can obviously size yours as you wish.
To make the decoration you will also need felt in brown, white and green, ribbon, buttons, stuffing and thread.
 
* Cut out two of the pudding and sauce pieces in the brown and white felt.
* Sew the white felt pieces (for the sauce) to the brown felt pieces.
* Place the two brown pieces together (wrong sides together).  Take a strip of ribbon (I find 8" is a good length for hanging on a tree), form a loop and insert the ends between the two pieces of brown felt.
* Sew around the edges of the brown felt pieces, leaving a small gap at the bottom (for the stuffing).
* Cut out four holly leaves from the green felt.  Position two of these on either side of the ribbon at the top of the pudding.  The ends of the leaves should slightly overlap.  Take your buttons and place over the ends of the leaves on both sides.  By hand, sew through from one button to the other, being sure to sew through the holly leaves and the pudding to secure all the pieces together.  You'll want to go over this a couple of times at leas.
* You're nearly done.  All you need to do is add stuffing and sew up the gap.  And you're done!  One pretty little Christmas pudding to hang on the tree.

These little puddings are not about perfection.  Their charm is that they look handmade.  So never mind any wonky edges.  Making something to give to people you care about brings a pleasure like no other.  And after all, giving is what this season is all about.

Merry Christmas!


Monday 12 November 2012

Tea for two

Christmas lights are going on, I've started my Christmas shopping and the John Lewis Christmas advert is showing on TV.  Christmas is 42 days away and I'm feeling festive. 

I've started making Christmas decorations (more on that to come) and it got me thinking about Christmas presents I have made in the past.

This cushion is a present I am particularly proud of.  The execution may not be perfect, but it was the perfect present for this friend, who like me shares a love of textiles and tea.

I started by drawing the stencils to fit the size of the cushion.  I tried a few designs for the teapot, but this was the most pleasing.

I won't lie, the appliqué was fiddly, in particular the insides of the handles.  The stitching is not perfect and is not something to be examined too closely!  But I am pleased with the overall effect.  And no-one is more surprised than me that it actually looks like a tea pot!  The saucers were the most difficult to do and are the one thing I would do differently if I were to do a similar design in the future.

All in all, I am quite proud of this cushion.  Yes it was tricky, but I am all the more pleased that the overall effect works.  And there's nothing quite like the satisfaction that comes from putting in the effort to make a perfect gift for someone which you know they are going to love, imperfections and all.

Wednesday 24 October 2012

A little note

When I wasn't able to make it to a friend's wedding I decided I wanted to make a card for the couple.  I had been really pleased with my previous attempt at making my own stencils and this seemed a good opportunity to have another go.

I knew that I wanted to keep the overall design of the card simple.  The idea was to create a personal card rather than anything particularly flashy.  The image actually started as a quick doodle of two hearts on a post-it note!  Making my own stencil meant I could personalise the design, which I did by adding the couple's initials.

I made the stencil from paper rather than card (unlike my previous attempts).  On the plus side, this meant that the image was easier to cut out, which was helpful given that it was a bit fiddly.  On the down side, it didn't produce the sharpest image and there are a few little smudges where the paint seeped through in places it should not have.

Perfect it is not, but it is personal.  It was the personal touch that was important to me when I planned this card; that objective having been meant, I really don't think I can complain!

Sunday 21 October 2012

Seeing hexagons

I did say cushions would be a recurring theme on this blog!

This one was made with some gorgeous vintage fabrics given to me as a Christmas present.  Hexagons are  time-consuming, but I think the hours spent on this cushion were worth it.

I have to admit I did cut corners in the process.  You are supposed to cut out paper hexagons (I cut mine from old newspaper, but you can buy paper hexagons to save time if you want) and then tack the fabric patches around these paper templates so that each fabric patch holds its hexagon shape while you sew them together.  However, I found that ironing the fabric patches around the paper templates was sufficient to get them to hold their shape while I then sewed the edges together.  I took a fairly haphazard approach to this cushion, rather than organizing the hexagons in any pattern, which I think this was the right approach for this cushion.


This was also the first time I have put a zip into a cushion cover.  I did feel rather ambitious when it came to reaching for the zipper foot on my sewing machine, but it actually went ok.  The fabric is slightly warped in places along the edge of the zip, but the zip does zip up, so I'm happy!

Life is too short sometimes, and yes, I did take a shortcut; I didn't do everything you are supposed to do when working hexagon patchwork, but I don't think the final result has suffered for it.  So not perfect perhaps, but good enough!

Sunday 14 October 2012

A cushion to comfort


A couple of weeks ago I asked what was important to you in a cushion: looks or comfort.  You clearly like to have your cake and eat it; a cushion without both looks and comfort is not worthy in your view.

This is not the most chic of cushions, but I like to think it has its own certain charm.

This is a cushion to hold your hand and comfort you; a cushion to be hugged and squeezed.  It's made from a favourite old pyjama shirt.  Years of wear had left the fabric lovably soft, but also meant that the pyjamas were close to falling apart.  They had been my favourite pair for so long I could not bear to part with them.  What better way to hold onto them than to turn them into a cushion?

I could have made a simple red tartan cushion, but I wanted to try to keep the look of the pyjamas and retain their spirit somehow.  To this end, I included the pocket and buttons of the pyjama shirt in the cushion cover.  I think using these adds some interest to the design.  I opted to sew up the front of the shirt, but if I were to attempt a similar project in the future I think I would use this to create a pocket - it could make a lovely case in which to keep pjs.

Thursday 11 October 2012

Women for Whales


When a friend announced her intention to attend an event in support of Women for Whales (a campaigning group run by our surf instructor among others), it seemed a perfect opportunity for me to channel my creative enthusiasm into something which would have a broader purpose than just looking pretty.

I really liked the idea of using a technique that was a traditional woman's craft associated with the home and using it to create a banner that would be used in a women-led protest aiming to reach out and raise awareness.

A successful protest banner should attract people's attention and clearly convey what it is about.  I hope you agree that this design succeeds against those criteria!

The overall design looks deceptively simple.  The whale is made up of rectangles stitched together.  Oxfam sells packs of recycled cotton squares, taken from offcuts in textile factories, ranging in colour and pattern.  I had a few of these packs which I had bought for a rainy day (or rather until I came up with an idea on how best to use them) and so I raided these for blue cotton squares.

I started by sketching and cutting out the design of a whale on paper and cutting the square cotton patches in half to create rectangles.  These I separated by shade.  I was lucky that one of the pieces had a circle, which was perfect for the eye.

I arranged the rectangular pieces in lines over the paper whale pattern, trying to use those pieces with a white pattern to represent the underside of the whale.  These pieces were then sewn end-to-end to create long strips, which were then lined up side-by-side and sewn together.  The resulting patchwork was then trimmed to size and appliquéd onto the white sheet (I had already cut this to size and sewn a hem).

I kept the design of the letters simple to make life easier for myself.  I think the bold lettering works fine though, and at least is legible.  The orange fabric is something I had used as a sarong at one point, but hadn't been worn for several years.  I think the bright orange works well with the blue and the pattern of bright small flowers adds a feminine touch.

This banner got its first outing in Brighton, at the annual paddle round the pier event (the photo is one taken by my friend at Brighton Beach).  Women for Whales are continuing their campaign, so hopefully it will get a few more outings yet.

Oxfam's Ethical Collection recycled cotton squares can be bought here.

You can read about Women for Whales here.

Sunday 7 October 2012

Aubergine in a chocolate cake? It'll never work...


At the same time as my attempt at blueberry and lemon scones, I undertook another adventure in the kitchen - using aubergine in a chocolate cake.

I know, it sounds weird; it sounds like it should not work at all.  But then there's carrot cake, so why not other vegetables?  I have previously used courgettes to make a chocolate cake, resulting in a moist cake with a lovely taste without being too sweet.  When I was given Harry Eastwood's recipe book "Red Velvet and Chocolate Heartache" as a present, the possibilities for further experimentation with vegetables in baking opened up before me.  This is a gorgeous book and the few recipes I have made from it so far are easy to follow (with helpful tips for novices like me!) and the results have come out rather yummy.  The book also includes some of her "cake diaries".  These are interesting as they give you an insight into the trial and error that is involved in creating the recipes - showing that even for a professional cook, things are not always perfect first time.

For the Ps' visit, I decided to risk making Harry's "Chocolate Heartache" cake.  The aubergines are heated in the microwave before being skinned and puréed.  By the time they have been combined with melted chocolate and all the other ingredients you would be hard-pressed to know there was any aubergine in the cake mix.  The finished result was a deliciously indulgent torte-esque chocolate cake.  I challenged the family to guess the "mystery ingredient" and no-one could - although they all agreed the result was delicious.  Even my brother gave it the thumbs up, and this was after he found out what it did contain - I cannot ask for higher praise than that!

I will certainly be making this cake again.  It has also given me the confidence to be brave in my baking, and I am looking forward to trying another of Harry's recipes soon.  So watch out, the next time you're biting into one of my cakes you may be surprised when you learn what it contains!

To find out more about Harry Eastwood, and to order her recipe book "Red Velvet and Chocolate Heartache”, click here.

Sunday 30 September 2012

Between the pages


At a craft fair this summer I saw old hardback books being used to hold business cards.  I loved the idea, so thought I would try it out for myself.

These are incredibly easy to make and I think they look really effective holding a couple of postcards.  All you need is an old hardback book (which you can pick up very cheaply from a charity shop), something to decorate the covers and a little bit of time.  Do think about the quality of the book you are buying - the ends will be on display so have a look at these e.g. is there any discolouration.  Also, think about the colour of the hardback cover, as this will be seen on the edges.

Fold each page in half (a good job to be done in front of the TV).  Then choose your decoration for the insides of the covers.  I went with some pretty Cath Kidston writing paper, but you could use recycled wrapping paper, stickers, or even fabric.

I think these are a great make - simple and relatively quick - and they have a certain charm without being too homespun or twee.  They may become my go-to craft for birthday presents - you have been warned!

Monday 24 September 2012

They're not Betty's, they're mine...


Scones have to be one of my favourite treats, whether for elevenses, afternoon tea or supper.  I have long wanted to have a go at making them, but have hesitated because of the fear that I would make a mess of these delicious bites.  I decided this could no longer hold me back; I mean, who ever heard of anyone being afraid of a little thing like a scone?!  Luckily, I could call on the superior baking knowledge of my friend Maud, who reliably advised me that the Betty’s recipe for scones is the best of those she has tried.

I had read in another recipe book of adding blueberries and lemon zest to scones, and could not resist giving it a try (although I know it may seem sacrilegious to think you could ever improve a Betty’s recipe!).

I often use visits from the parents as an opportunity to try out new recipes.  I’ve had no complaints yet as a result of casting them in the role of guinea-pigs for my culinary attempts!  I have to admit the scones were rather yummy, and they went down well with the Ps.  Using blueberries and lemon means there is no need for jam.  The lemon gives the scones a refreshing flavour and given that blueberries are a super-fruit, surely eating one of these scones must count as one of your five-a-day?

So I finally got up the courage to make scones, and even to put a little twist on them.  Not only were the results yummy, they've also given me a smidgen more confidence to be open to future adventures in the kitchen.

You can find the Betty’s recipe in their book A Year of Family Recipes.

The Great British Book of Baking contains a recipe for blueberry and lemon scones.

Thursday 20 September 2012

A Trip Around the World


Having completed my first quilt, the prospect of starting the next was a little less scary.  When I heard the news that two of my close friends were expecting their first child, I quickly decided that I wanted to make a cot quilt for when the new baby arrived.

Choosing the fabrics for this quilt was really fun.  I went with bright, sunny fabrics, which would be suitable for a girl or boy.  I wanted to include a nursery pattern, but nothing too cutesy, so I was really pleased when I found this red alphabet fabric at Doughty's shop in Hereford.


This pattern is called Trip Around the World.  The new parents are keen travellers and so I thought this would be a perfect pattern to adorn a quilt for the new addition to their family.

As I was on a deadline, I decided to make this quilt by machine rather than by hand to ensure I had it finished in time.

I made this quilt using the strip-piecing method.  There are already plenty of instructions on the internet for this pattern, so I won't try to explain the detail here when others have already done a much better job than I could hope to.  For an example of instructions with useful diagrams, see this so-called "idiot's guide".

This method involves sewing strips of the fabric together to form a complete loop.  This loop is then cut widthways, so you are left with loops made up of squares of each of the different fabrics.  The trick is to then unpick these loops so that you have strips made up of the different fabric squares sewn together.  These are then sewn together to build up the pattern.

Making this patchwork top by machine meant it grew fairly quickly, and it was really pleasing to see it progressing.

For the quilting, which I also did by machine, I decided to use a basic pattern of straight lines to emphasis the diagonal lines of colour on the patchwork top.  It also makes a pleasing pattern on the reverse of the quilt.

I have written previously about my first attempt at mitered binding.  This was my second attempt, and I think I can see improvement, which is always encouraging. 


Making this quilt was not without its frustrations.  I always want to do things well, and this time I particularly wanted to do a good job as this quilt was going to be a present.  It was frustrating when the seams of some of the squares did not match up perfectly, or the machine quilting did not stay true.  But this is the nature of quilting, and something I need to accept if I am to be a quilter.  Making this quilt has helped me accept this.  It is lovely to be able to make something for a special new baby, and my friends are really pleased with the quilt.  Being able to make things for people you care about is a wonderful thing.  Thinking about it this way helps me realise that projects like this really aren't about striving for a perfect make.  They are about the time and thought invested in them.  And I am not going to let a bit of frustration over minor mistakes stop me making things for the people I care about.

The finished quilt measures 86x100cm approx.

Saturday 15 September 2012

Bunting - not just for special occasions


It's been a busy summer for bunting, from the Diamond Jubilee to the great British Sporting Summer.  At a stretch, the patriotic bunting can probably be left up until after the Last Night of the Proms, but any longer is probably pushing it.

But I don't think the end of the summer means we have to pack up the bunting for good.  There is something about seeing bunting hanging up that lifts the spirits with its positive associations of celebration.  I have long wanted to make my own bunting, but (like so many other projects) finding the time is another matter.

Below are two bunting projects I have recently completed.  They are simple to do, relatively quick and the possibilities to adapt them are endless.  You don't need a sewing machine, or even a needle and thread.

Welcome bunting banner
This project actually started with the ribbon.  Having bought some pretty ribbon in a Cath Kidston sale, I was thinking of how best to use it.  It didn't take long to decide that it would be a lovely starting point for a welcome bunting banner.

First, I measured a template for the size of the bunting triangles (16x19cms approx) and cut these out ready to decorate.  Once I had decided the size of the bunting triangles I could make the stencils.  I started by sketching out the letters and pictures.  Once I was happy with the design of these, I traced these sketches onto card.  Then came the tricky bit: cutting the patterns out.  A steady hand is needed!


I used a sponge and watercolour paints, choosing bright shades to complement the colours in the ribbon.  Once dry, I laid out the triangles, cut the ribbon to the required length and stapled the triangles to the back of the ribbon.  The triangles overlap slightly behind the ribbon.


This bunting is not perfect, but I am really glad I tried.  There is the odd touch of paint where there shouldn't be, but letting that go, the overall effect is rather jolly.  I was a bit worried that once finished this bunting would look twee, but I think it manages to avoid that.
 
 
I have to admit that I am particularly pleased with the teapot and tea cup prints, which look more effective than I had anticipated they would.  Using repeats of these two images could potentially make some lovely bunting - possibly a future project!
 

Over time you can gradually build up a good collection of home made stencils.

Stencil bunting could be great for displaying a Happy Birthday message, or putting a child's name on their bedroom door.


Literary bunting


A craft fair I visited this summer had lines of bunting decorated with limericks hanging from the ceiling in a nod to a local poetry festival.  I liked the idea of decorating bunting with text and thought I would try it out for myself at home.

As I intended to hang the bunting between my kitchen and dining area, I decided to go with a food theme.  I had a lot of fun going through books to try to locate passages that I half-remembered.  There were lots of passages to choose from, and the final line-up includes text from Wodehouse, The Wind in the Willows, Swallows and Amazons, Gerald Durrell, the Worst Witch and Winnie-the-Pooh.
 
This bunting is very easy and quick to make.  Having drawn up a template so I knew the size of the triangles I had to fill (15.5x18cms approx), I typed up my chosen extracts so that I could influence their layout on the page (if layout is not a concern time could be saved by scanning the pages instead).  These were then printed onto card and the triangles cut out.  I cut out the bunting triangles so that the text appears at different angles on a couple of the triangles. 

Again, the possibilities are endless.  Decorate bunting with favourite recipes for the kitchen, nursery rhymes for a child's room or Christmas carols to add to a festive atmosphere.

So go on, hang out the bunting!

Monday 3 September 2012

A quilter at last


This is not the first patchwork quilt I’ve started, but it is the first one I’ve finished.

I fell in love with patchwork quilts on a trip into Amish country as an impressionable teenager during a family holiday in the USA.  I came back from that holiday and immediately ordered a book about patchwork.  It would be a few more years before I started my first quilt (a log cabin design which over ten years later I still haven’t finished).  When I was given some gorgeous vintage fabrics for Christmas I knew that I wanted to try patchwork quilting again.


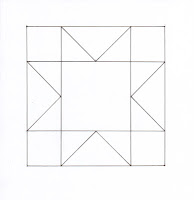
For some time I had wanted to try the Ohio Star block and leafing through some old patchwork quilting books I found a lovely design for a small quilt using a combination of a variation on the Ohio Star block pattern and a framed Nine Patch block pattern.   

This is a simple variation of the Ohio Star pattern block. Click here if you would like to read a brief history of the Ohio Star Quilt on ehow.com.


The finished quilt measures 57x57cm

Like any budding quilter I have managed to accumulate a stash of fabrics over the years, either through unwanted fabric donated to me by others or fabric left over from my previous projects.  A quick rummage through my collection uncovered the dark blue fabric used to frame the Nine Patch blocks and which is also used as the backing fabric.


 As this was my first attempt at quilting (the sewing together of the three layers) I decided to keep the quilting design straightforward and so I used a simple grid design, crossing in the centre of each patchwork block.


The quilting pattern stands out on the back of the quilt


All the sewing was done by hand, except the binding, which was machine stitched to the front side, then folded over the raw edge of the quilt and hand sewn to the back.  Mum taught me how to do these mitered corners.  I still have some practice to do to get them perfect, but for a first attempt (with more than a bit of motherly assistance!) I'm rather pleased with them.

If you want to try this binding technique there is guidance on this quilting website explaining how to sew mitered binding, including these mitered corners.

This quilt is not perfect – the lines don’t always match up as they should and putting the binding on didn’t always go to plan.  But once I stopped scrutinizing the details, took a step back and let go of those criticisms, I found that I was pleased with the overall effect and, dare I say it, a tiny bit proud of my first little quilt.  And yes it may be small (I don’t know that it would even qualify as a lap quilt!), but I think the fact that I actually managed to finish this one just goes to show that taking baby steps can lead to beautiful results sometimes.

It's been 15 years since I fell in love with quilts and having finally completed one I feel I have at last earned the right to call myself a quilter.  And seeing as my infatuation with quilts started when I was staying in Ohio, it seems fitting that my first completed quilt should include a variation on the Ohio Star block.

Thursday 30 August 2012

A cushion to knock the spots off all others...


I love cushions (expect them to be a recurring theme).  A cushion is a small canvas on which to inject some personality, to have some fun with and take the risk of being a bit bolder, of trying something a bit different.

I wanted to create something special to give to a friend for her birthday.  Knowing she’s a fan of red and white spots I quickly decided that I would make her a cushion on this theme.  But I felt it needed something more.  A sprinkling of buttons might just be what was needed to lift this cushion to be a little bit special.  A quick raid on my and Mum’s button boxes supplied a good variety of red and white buttons.  Then it was just the small matter of finding the fabric.

My need to constantly make the “right” decision makes choosing fabrics for any project tricky, especially when I am making something to give as a present.  I have to work hard to remind myself that there is no right and wrong when it comes to fabric choices!

The initial idea in my mind had been plain red with perhaps a white fabric with small red spots.  However, it is rare that you will find exactly what you are looking for, and you need to enter a fabric shop with an open mind; flexibility is your friend here.  Enter with an open mind and time invested browsing the aisles of a well-stocked fabric shop can reward you with a winning combination of fabrics you would never have imagined walking away with.  Having pulled out various fabrics, holding up different whites to various reds to try to find that elusive “perfect” combination, I eventually made a decision.  A red/purple tinged stripe and an off-white with purple spots was not what I had planned on buying at all, but that was the combination that struck a chord.  I think it works; the patterns contrast but do not clash and I think it adds another layer of interest to the overall look of the cushion.  But judge for yourself…

First the planning:

I started by planning the size of the spots and laying these out with the buttons.  Once I had settled on the size of the spots, I could cut the fabric.

Then the assembly:


The spots were pinned and tacked in place before being machine appliquéd.  The buttons were sewn on by hand.  I then machined three and a bit sides of the cushion cover (correct sides together) before turning through, easing over the cushion pad and then hand stitching the fourth side closed.

And the finished cushion:


This is a cushion that is all about its looks.  And, perhaps surprisingly for a cushion adorned with buttons, it doesn’t scrimp on comfort either.  Most importantly, my friend seems to love it.


I went with a sprinkling of buttons to give this birthday cushion an extra little something; but what would you have adorning your ideal cushion?  I’d love to hear your ideas.