Friday 27 December 2013

Knitted hot water bottle cover

This is the second hot water bottle cover I knitted this Christmas - I didn't include it in my previous post as it was a present for my Grandma who I was seeing after Christmas day.

knitted hot water bottle cover
 
Both my grandparents liked their present, and it gave me a lot of pleasure to be able to make something for them.

Tuesday 24 December 2013

Christmas makes

I know I haven't posted in a while, but I can assure you it's not because I've been idle!  I've been working my socks off this past month to try and get everything made in time.  Unfortunately, I was a bit over-ambitious about what I could achieve in the time available, so some makes are going to have to be presents for next year!  But now it's Christmas Eve, so I thought I would reflect on what has gone well.

I'm really pleased that I managed to make reindeer decorations for just about everyone I had been planning on giving one to.  Everyone who has had one seems to like them, so I'm happy.


cabling
I'm rather proud of this hot water bottle cover that I have knitted for my Nana.  This was my first real attempt at a cabling project, and the final result is better than I had hoped.  I know she is going to love it, and as a granddaughter I get great pleasure from being able to give homemade gifts to grandparents.  I only have two grandparents left, and they are incredibly important to me so I like to be able to make a fuss of them.

I actually found the pattern for this project in a knitting magazine I bought in a charity shop for 50p - another small victory for charity shop browsing!


I have previously posted about the Christmas fabric that M gave me.  I used this, along with unbleached calico, to make Christmas bunting.  I have to admit that I am really quite proud of the result.  I hope to make more for next year.
bunting

bunting

Wishing you all a very Merry Christmas.

Friday 6 December 2013

Christmas decorations - reindeer

Dasher, Dancer, Prancer, Vixen, Comet, Cupid, Donner, Blitzen and, of course, Rudolph.  Reindeer are very much a part of Christmas tradition.  This year I decided to use a reindeer as the design for my felt Christmas decorations.

I previously shared with you some early prototypes of my felt reindeer decorations.  I've now refined and finalised the design.  As I had hoped, pipe cleaners solved the droopy antler issue, and I've also rounded off the ears slightly (a good dose of artistic licence was used in the making of these decorations!).  I hope you like the final result...

reindeer
 
 
If you want to have a go at making these, you'll need:
  • brown felt (there are lots of websites selling felt, I used Colour-Full Felt)
  • ribbon (about 8" per decoration, longer if desired)
  • black buttons
  • red buttons
  • thread - brown, black and red
  • pipe cleaners
  • stuffing (such as this soft toy filling from John Lewis, or you can use scraps of felt cut up into small pieces)
  • the templates
The ribbon and red sparkly buttons I used came from John Lewis.  The black buttons and pipe cleaners I sourced from Hobbycraft


reindeer template
The head measures approximately 3" (h) x 3 1/2" (from tip-to-tip of ears);
the antler is approximately 3" in length.
* Start by cutting your pieces from the felt, using the templates provided.  You'll need two head pieces and four antler pieces per decoration.  You may find it easier to cut the pieces for the antlers slightly wider then the template (you can then trim these after you have sewn them together).

* Sew, by hand, the buttons for the eyes and nose into place on one of the head pieces.

* Take two antler pieces, lay one on top of the other and, using a sewing machine if you have one, sew carefully around the edges.  Leave a gap at the bottom of the antler so you can insert a pipe cleaner.  Repeat with the other two antler pieces.

* Take one of your antlers and use a pencil or something similar to open up the gap at the bottom of the antler and insert a pipe cleaner, trimming it so it is the length of the antler.  If you find that the pipe cleaner is catching on the inside of the antler, fold over the tip of the pipe cleaner so that there is no sharp wire exposed.  The pipe cleaner should then slide into place, all the way up to the tip of the tallest antler.  Trim the edges to the antler to neaten as desired.  Repeat with the other antler.

* Take the undecorated head piece and lay it on the table.  Place the two antlers on top, between the ears.  Take an 8" length of ribbon, fold, and place between the two antlers.  Then lay the head piece decorated with buttons on the top (correct side up).  Effectively you have a sandwich: the raw edges of the antlers and the ribbon should be sandwiched between the two head pieces.  Pin the ribbon and antlers into place.

* Starting from near the bottom of the head, sew around the edge of the head pieces (use a machine if you have one).  Remember to leave a small gap (about 1") at the end.

* Trim the edges if needed.  Stuff the decoration, using the flat end of a pencil (or something similar) if needed to gently work the stuffing into the ears.  When you are satisfied that it is sufficiently stuffed, sew up the gap by hand using backstitch.

And there you have it, one Christmas reindeer to hang on the tree.

Thursday 14 November 2013

Christmas treat - mini mince pie

Not made by me, but this unexpected Christmas treat in today's Abel & Cole box has definitely added to my festive mood.


Monday 11 November 2013

Christmas decorations - the planning stage

I haven't posted recently, mainly because I have various projects on-going at the moment and none quite finished.  But I thought I would share with you some previews of what I'm working on...

For me, October is when I start thinking about Christmas.  The leaves are turning, the scarves and gloves come out, I'm humming the tune of "Autumn Days" to myself on my way to work - and I start to plan my Christmas projects.

Like everyone, I have my traditions.  Watching The Snowman, ice-skating in London, watching the Muppet Christmas Carol in German (my friend's German and it's her copy, so not quite as random as it first sounds!).  And now there are my felt Christmas decorations - a different design each year.  This is the fifth year I will be making decorations.

reindeerAs I have quite a bit of brown felt left over from previous decorations (robins and Christmas puddings) this year I decided to have a go at reindeer.  I've made a couple of prototypes but still need to do more work to refine the design.  You've probably noticed one flaw - droopy antlers!  I'm working on a solution...

I'll share the next round of prototypes with you, and when I've decided on the final design I'll post the templates.

I'm also thinking of making some Christmas bunting; my Mother very kindly gave me some Christmas fabric left over from a quilt she made. 

Wednesday 9 October 2013

chicken doorstop

A quick one - the Guardian website has a great archive of makes, including this chicken doorstop.  The instructions suggest filling with rice, but I was worried about attracting mice so filled mine with small stones (sand would also do the trick...).  I used a shirt bought at a charity shop; the red fabric and buttons I already had.  I made this for the P's, who were very pleased with it.


Monday 30 September 2013

Jam making

I promised to share with you my jam-making exploits, so here goes.

BlackberriesOf the many joys moving into a new house brings, discovering the garden and all the varied things it has to offer over the course of the year is one of the most interesting, and the one that usually brings the more pleasant surprises.  One of my happiest discoveries has been that I only need venture to the bottom of my garden to forage for blackberries.

Blackberries
The less ripe berries are higher in pectin and
 so it is a good idea to include a few of these
I decided that it was time I did something with these blackberries.  Never having made jam before, I thought this would be a good opportunity to try.  However, blackberries are a low-pectin fruit so need some assistance when it comes to getting a good set on your jam.  I read that a good trick is to add a few squeezes of lemon juice to the fruit before you start the heating process.  As ever, Mother was on hand with advice, and suggested I combine the blackberries with apples, which are a high-pectin fruit.

Attempt #1
For my first attempt I used apples from the garden.  I used equal amounts of blackberries and apples, and matched the combined weight of the fruit with granulated sugar.

It started out promising, but because the apples were eaters not cookers, they didn't dissolve.  Never mind I thought, I'll strain the mixture and make a blackberry and apple jelly (apparently it's a jelly if it's strained).  Not having a jam thermometer, I used the cold plate test to try to judge when the mixture was ready. 

The cold plate test involves putting a drop of the mixture onto a cold plate (pop in the fridge or freezer), letting it cool and then gently pressing from the side with your little finger; if the jelly wrinkles it's ready to set.

Unfortunately I didn't really know what I was looking for, and overcooked it.  The result, when it cooled, was a very sticky mess at the bottom of the jar!  Not wanting to throw it away I put it in the fridge anyway, and I'm glad I did.  In a lesson that most things are salvageable, Maud helpfully advised that I could reheat the mixture with some extra water.  The result of this was a much more pleasing, and edible, set jelly.  It is rather sweet, probably because I used eating apples (which are sweeter than cooking apples).

Attempt #2
A definite improvement.  This time I limited myself to blackberries.  I used equal weight of blackberries and granulated sugar.

Early on in the cooking process
Having overcooked once before, I had a better idea of what consistency I was looking for to know whether the jam would set.  When doing the cold plate test you're not looking for wrinkles so much as signs of a skin forming on the top.  Basically when the jam on the plate cools, ask yourself whether it is the right consistency for putting on a scone.  If the answer is yes, your jam is done!  And a good tip from Maud: don't forget to take your pan off the heat while doing the cold plate test, or your jam mixture will carry on cooking!

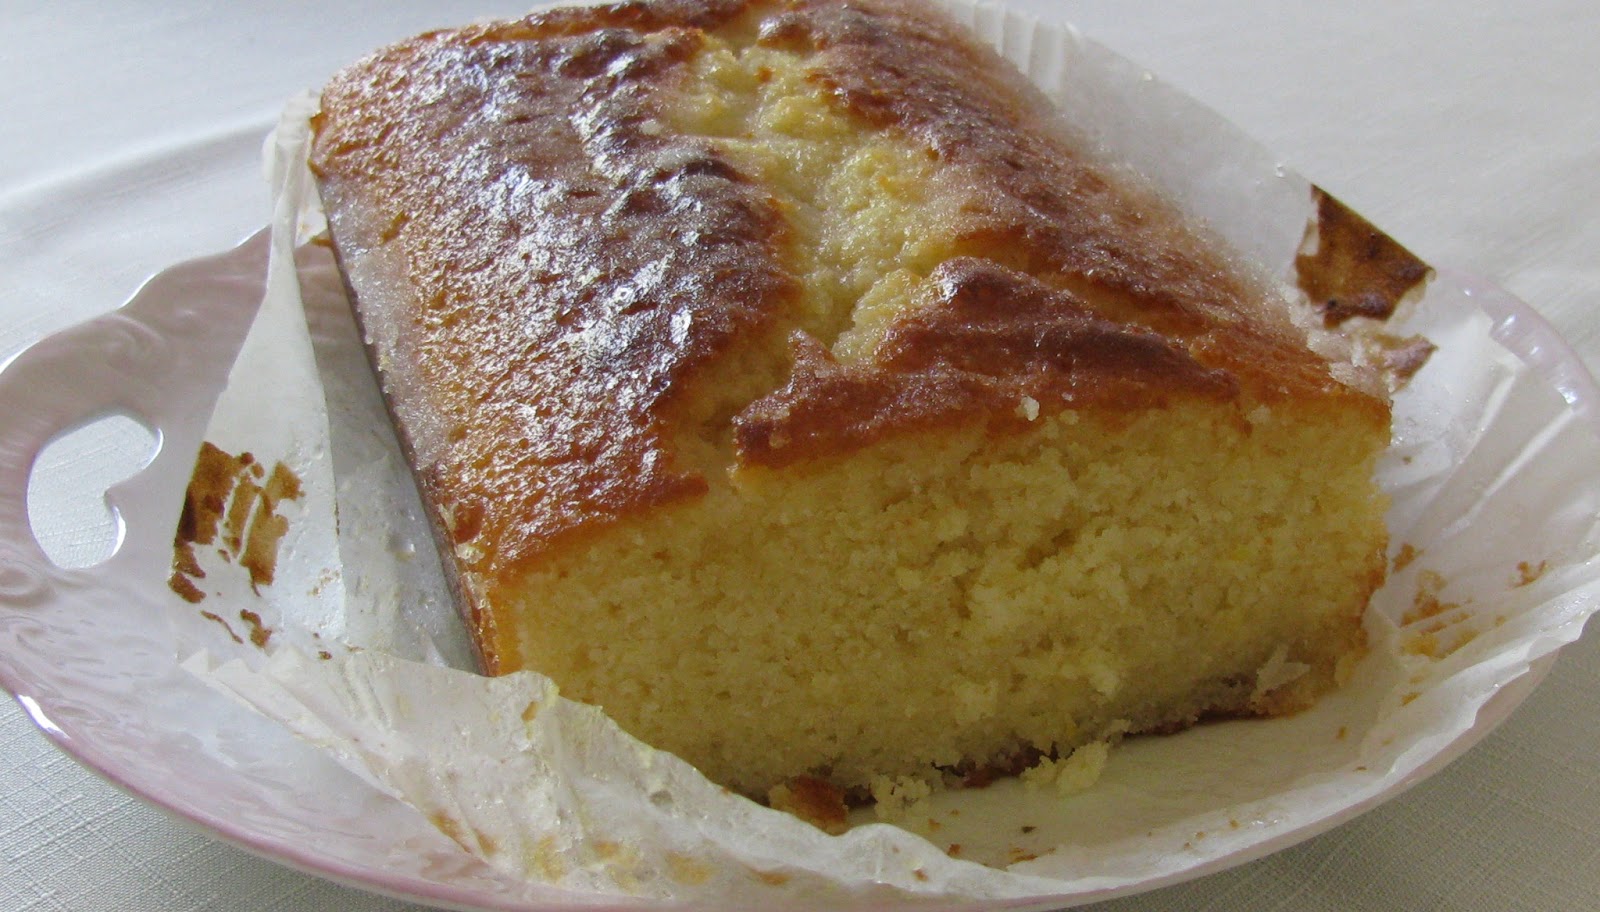
I was really quite proud of my second attempt.  It tastes rather good, even if I do say so myself, and went very well some homemade scones.

Attempt #3
Mother gave me some Bramley apples from her garden, so I thought I would try blackberry and apple again.  This time I cut the apples up a lot smaller, and being cooking apples they dissolved (which meant no need to strain).  I used equal weights of blackberries and apples.

For this attempt I used jam sugar, my first time using this.  Jam sugar has pectin added to it, and so helps with the setting process.  As apples are high in pectin I used slightly less sugar than the combined weight of the fruit.

The result is not as sweet as the first, and I prefer it for this.  It has quite a firm set, but my no means is this too much.  In all, a successful first attempt with jam sugar.


It's going to take a lot of scones for me to get through all this jam...


Jam
This is my second attempt and is a simple blackberry jam.

Wednesday 11 September 2013

Spinach and green bean tart

One of the joys of being a first time gardener has been growing my own vegetables.  I take a ridiculous delight in being able to pick spinach for dinner just minutes before I toss it in the pan.  Freshly picked beans and spinach, lightly cooked, with some pasta and topped with a sprinkle of parmesan make a delicious, simple, supper.

So when I had Grandma and the P's coming for lunch I knew I wanted to do something that would make use of my modest crop.

Felicity Cloake does a great weekly baking column in the Guardian called "How to make the perfect...".  A few months ago she published a recipe for a perfect asparagus tart.  I tried it at the time and was pleased with the result.

This time, I adapted the basic recipe of Felicity Cloake's asparagus tart.  Instead of the asparagus I mixed spinach leaves into the cream mixture and poured this over the cooked green beans I had already arreanged on the base of the tart.  Halfway through baking I sprinkled some grated parmesan over the top.  I took the easy route and used frozen pastry, but I am no less proud of the result.


This was a lovely way to use the spinach and beans from the garden, and more importantly it tasted rather good.  From garden to table in a matter of hours.  M brought potato salad (made from potatoes grown in her garden and local village eggs) and lettuce from her garden, so it was a meal made up from a real family harvest; a lovely way to welcome in the autumn season.
I love the layers in this tart.

Monday 9 September 2013

Afternoon tea with carrot cake

Time spent in the kitchen to produce homemade bakes for friends and family is never time wasted; the results are always appreciated and it's a real joy to sit down with the ones you love and be able to share with them something you have spent time (that most precious of things) making just for them.

My dear friend Maud came to see me on Saturday, which gave me a lovely excuse to get out the china and set out an afternoon tea spread.

We got through several pots of tea (Betty's, of course) while munching our way through sandwiches and sweet treats.  For the sandwiches I was fortunate enough to have been in receipt of a batch of fresh eggs, which had come from a farmer local to the P's in Herefordshire.  Beautiful deep yellow yolks made the egg mayo sandwiches all the more enticing.

I had fun planning the baking.  The cake is a carrot cake made from a recipe in the Great British Book of Baking.  The recipe is easy to follow and makes a yummy, moist cake.  Carrots, walnuts, orange zest and spices flavour the sponge, and the frosting has a cream cheese base given a citrus lift with the addition of orange zest and fresh orange juice.  It was really rather good, even if I do say so myself.

Another first was the chocolate chip shortbread.  A quick and easy recipe, made in a fluted tart tin and divided into eights, the pieces are a lovely accompaniment to a cup of tea.

I also made scones.  Following my previous experiments with blueberry scones and cheese scones, only a batch of traditional sultana scones would do for this occasion, and were a perfect way to try the homemade blackberry jam I had made the week before (more on my jam making exploits to follow in a later post, I promise).

And if you're thinking this all sounds like a lot for two people, you would be correct!  A long tramp through the fields and along the river meant we were ready for seconds, but there was still a lot left so I was able to send Maud away with a few treats.  As for the rest, my brother seems more than willing to help finish them off.


Sunday 1 September 2013

Baby name bunting

This weekend I had the joy of joining some friends as they celebrated their little boy's first birthday. I wanted to make something as a present, and I decided I would try to make some personalised bunting, decorated with their baby's name.  Fortunately the result was as good as I could have hoped for.


I have written previously about my attempts at making bunting from card.  This time I went for fabric bunting, using calico for the triangles. I had some fabric left over from the cot quilt I had given my friends the year before when their son was born, and I used this fabric for the lettering.

If you want to have a go at making something similar, the process is pretty straightforward:

* Decide on your size of triangle - this will dictate the size of your letters.  Make a template.  Draw and cut out (remembering to leave seam allowance) your triangles from the calico.  I find tailor's chalk really helpful for this.
* Draw and cut out templates for your letters.  Think about whether you have anything that can help you with this - I used a cookie cutter to help me with the star (I had to scale down the size a bit).  Once you have the templates for the shapes, cut these out from the fabrics you have chosen (think about choosing colourful fabrics that will stand out against the calico).  Small scissors help here!  I never throw away templates - you never know when they will come in handy.
*  Attach the letters to the calico triangles.  I used Bondaweb for this; I found it made the appliqué process a lot easier than my previous attempts at this skill, and I think it makes for a neater result.  It's very easy to use.  Using your templates you draw and cut out the shapes you need from the Bondaweb, iron these onto the back of the fabric pieces, peel off the backing and iron the pieces into place on the calico triangles.  Keep the edges neat by overcasting on a sewing machine.
* To make each bunting flag, take one decorated triangle piece and one plain triangle piece, lay right sides together, pin and sew along the two side edges (not the top).  Trim the edges, especially around the point, press the seams, and then pull through.
* I made my own binding to sew along the top of the bunting flags, but you can buy bias binding, or you could use ribbon.  I pinned this in place, folding it over the top raw edges of the flags, carefully lining up front and back edges, and then machine stitching into place.

I am really pleased with the finished result, and this will certainly be a project that I will be trying again.


Saturday 24 August 2013

Cheese scones

The weather has been miserable today.  Never mind; the cricket may have been rained off but I still had TMS to keep me company, and what better excuse is there than a wet Saturday to get in the kitchen and indulge in some baking.

And this isn't just any baking - this is baking with Betty's scone recipe.  I have previously had successful results with this recipe when I used it as the basis for my blueberry and lemon scones.  Today, I decided warm homemade cheese scones would be the perfect lunch-time treat on a wet and dreary day.

Cheese scones are really very easy to make, and everyone is likely to have the basic ingredients in their store cupboards (flour, butter, eggs, milk, cheese).  Putting the ingredients together doesn't take long, and then it's less than 15 minutes in the oven before you're taking them out.  Then the hardest part - having the patience to wait until they are just cool enough to eat!

Warm scones with melted butter, a cup of tea, the Saturday papers and the whole of the afternoon stretched out before me; who needs the sunshine?

baking


Sunday 18 August 2013

Large nine-patch quilt - stage 1

I've started work on some bunting today - can't tell you more at the moment because it's going to be a present.

What I can share with you is the news that I have finally (having started them last summer) finished all 16 of the framed nine-patch blocks for a large quilt I am planning.  There is still a lot to do, but this is a very pleasing milestone to have reached.

quilting


Oxfam used to sell recycled cotton squares (part of its Ethical Collection). I was so taken with the patterns, I bought several packs with no particular project in mind and put them away in my sewing basket for the proverbial rainy day.  When I set myself the challenge of making a banner for my friend to take with her when she went campaigning for the group Women for Whales, the blue and white patterened squares were perfect for a whale.

I knew I wanted to use the rest of the squares for quilting, but the question was what patchwork design.  I toyed with various ideas, but in the end I went for nine-patch blocks.  I felt that these were the best use of the fabric as this design made the most of the pre-cut squares and was the best way of showing off the varied, fabulous patterns.

The idea of framing the squares came later (an idea from my Mother), and for this I used unbleached calico.  I think it frames the squares perfectly.  You can buy pre-washed calico quite cheaply - I got mine from Doughty's.


quilting
Excluding seam allowance, each framed block measures 40x40cm

The next step will be to quilt each square before joining them together.  I did the patchwork by hand, but I may do the quilting by machine.


quilting

There are still decisions to make - what quilting design to use, what to use as a backing fabric, and what fabric to choose to join the squares.  As ever, I'll let you know how this project progresses...


Sunday 11 August 2013

Victoria Sandwich

cake
  
A summer classic: the Victoria Sandwich.  For this I used a recipe in the Great British Book of Baking.  This is the second time I have used this recipe and both times it has made a beautiful cake; the recipe is easy to follow and produces a lovely sponge.

cake
Both times I've made this cake it has garnered compliments, but it is easy to make and it is the finishing touches that I think make it special: the dusting of icing sugar, the fresh raspberries and of course this beautiful cake stand.

I have to say a word about the cake stand.  It was given to me by my Grandma after my Grandpa very sadly passed away.  The stand originally belonged to Grandpa's mother, and as Grandma isn't using it she very kindly gave it to me.  It gives me great pleasure to be giving it a new lease of life: I like to imagine that my Great-Grandmother at one time used it to present her own Victoria Sandwiches at gatherings of family and friends, and I am simply one person in a line of home bakers.  There is something about the permeance of objects handed down: it was here before you and it will in all likelihood be here after you.  Whatever seems so terrible today is really nothing more than a fleeting moment; more than a cake stand, it's a sense of perspective.

There's an interesting summary of the history of the Victoria Sandwich here (along with some good tips for making your own) - even including Mrs Beeton's recipe from 1861.  The Victoria Sandwich cake is named, as one would expect, after Queen Victoria.

For a cake whose joy is in its elegant simplicity, there is nevertheless plenty of competition to create the "perfect" Victoria Sandwich, and you can find yourself being judged on the choices you make.  Caster sugar or icing sugar?  Cream and jam, or just jam?  What kind of jam?  Cream or jam first?

I was reminded of this when handed a programme for my local Royal Show.  This includes strict instructions for making a Victoria Sandwich (and note these are still given in imperial!):

Divide between two 8" sandwich tins
3 large eggs
6oz butter (or margerine)
6 oz castor sugar
6 self-raising flour
raspberry jam
castor sugar on top

As you see, this recipe requires castor sugar on top.  This is also the approach taken by the WI and Mary Berry.  I used icing sugar, which I prefer for being light and soft on top of the cake - and is what the Great British Book of Baking recipe goes with.

On the cream and jam issue, I say one must have both (this is a treat after all), although the more traditional approach is jam no cream - but let's not treat that as sacrosanct (and Mary Berry says it's fine to add whipeed cream, so that's ok!).  And there's something rather therapeutic about whipping cream - that with a bit of patience and a spoon you can create white peaks of airy fluffiness.

As for flavour of jam, I say go with what you like.  I went with raspberry, but blackberry jam would be a great autumnal twist I think.

The advice I would give is to make sure you properly grease/line your cake tins - make the process of releasing the sponges as easy as you can for yourself.  The sponges can be made the night before, and you can whip the cream up the next morning and leave in the fridge until you use it, but I would recommend leaving it until the last possible moment before assembling your layers.

My Victoria Sandwich may not match the expectations of the traditionalists, and its not going to win me any prizes, but it was fun to make and even more enjoyable was sharing it with friends over a long overdue catch-up.  A perfect Saturday afternoon.


cake

Sunday 4 August 2013

Clothes peg bag

A relatively straight-forward, quick project this time.  I don't know why, but there was something that felt very grown-up about getting my own washing line.  Putting it up was just another one of those little things that goes towards making the house feel like my home.

A clothes line needs a clothes peg bag, so I took a break from working on my tablecloth to have a go at making my own.  I remembered that this was one of the projects in the Cath Kidston book Sew! a friend had given me a while ago (and which I have mentioned before on this blog) and I used this project as a basis for making my peg bag.

It was very helpful to have instructions on which to base my design, although I didn't follow these exactly.  For example, in Sew! the pattern is based on using a 30cm coat hanger, and it suggests that if you can't find a hanger of that size you could shortern a standard hanger by using a hacksaw to cut it.  I didn't really fancy trying to cut bits off a plastic hanger, so I used a standard wire hanger and drew my own template based on this.  Using a wire hanger was a benefit when it came to inserting it into the bag at the end, as it is malleable and could be moved into place easily.


The bag measures approximately 41cm (w) x 33cm (at the highest point)


I'm really pleased with the final result.  And because I already had the fabric (which in fact had been given to me some years ago) and used an old wire hanger, I've got this lovely clothes peg bag at no cost, except the couple of hours I spent on it, spread over two weekends.  So lots to smile about.  I've already been putting the bag into use and as a home-made addition to the ritual of hanging out the washing I'm glad I invested the time to make my own.

This is an easy, quick project and I would urge anyone to have a go.  I used a sewing machine, but it isn't necessary (it would just take a bit longer to do it by hand, but not much).  There are lots of ways you could embellish the basic design.  For example, if I were to make another clothes peg bag I would think about adding letters (in the same fabric as the binding) to spell the word "pegs" across the front of the bag.

Here's how I made the bag:


Using the hanger as my starting point, I drew a paper template and cut out two pieces of fabric.


I made bias binding by cutting strips of fabric, cutting the ends on the diagonal (45 degrees) and sewing these together, then folding and pressing the edges.


I cut a narrow slit in the front piece.  I first pinned the bias binding into place around the slit on the right side of the fabric, folding it into pleats at the corners.  Having sewn this into place (by machine), I folded the bias binding over the raw edge and hand stitched the binding into place on the wrong side of the fabric.

I found the folded corners very tricky, and they could be neater.  I think next time I would try to think of a better way to do the corners (e.g. two straight strips of binding rather than trying to go around such tight corners).

The next step was to join the two pieces of the bag together.  I lay these pieces down wrong side to wrong side.  I pinned the bias binding into place around the edge (pinning through all three layers of fabric), starting from the top (so as to leave a gap for the hanger) and putting small pleats in at the two bottom corners.  I machine stitched this into place, sewing through all three layers (the bias binding and the two main pieces).


I then folded the binding over the raw edge and hand stitched it on the back of the bag, before the final step of inserting the hanger.

Thursday 18 July 2013

Tablecloth with bird applique - stage 1

A small success - I have completed the edging on the tablecloth I am working on.


The tablecloth is a length of cotton sheeting, which I cut to size for my dining table.

To add the edging, I followed these steps:

I hemmed the raw edges of the cut sheeting to prevent fraying.  This was probably not strictly necessary and if I ever carry out this project again I would think about missing this step.  The picture shows the "wrong" side of the tablecloth.

I wanted to use a mix of fabrics for the edging, so I cut small lengths of fabric which I then joined together to create one long strip.  I pressed the seams and also folded and pressed the edges.

This is a picture of the "wrong" side of the tablecloth taken after I had sewn the strip of edging to the "right" side of the tablecloth.  I did this by placing the strip of edging, right side down, on the right side of the tablecloth.  I then used my machine to sew these together (the top line of sewing in the picture), folded down the edging to reveal its "right" side and ironed along the sewn line.

On the back, I hand stitched the edging, sewing along the fold to create a neat edge and making small, hidden stitches.


I am pleased with my neat corners.

The next stage will be to add the birds (a few of which are pictured below). You may recognise the shape - I used the same Cath Kidston template on this cushion and as a basis for my Christmas robin.  I used Bondaweb to help attach the wings; it's easy to use and I am pleased with the results.  I'll be using Bondaweb to help fix the birds onto the tablecloth.  And of course I will share the results with you as soon as I am done!


Sunday 14 July 2013

Creating a better mood


Lemon drizzle loaf cake: easy to make, and the combination of lemon zest, juice and sugar provides a sweet, zingy lift to any day; it's a joy to prepare as well as to eat.

"They say baking soothes the soul" 

Interesting article in the Guardian last week about whether baking can improve mental health.  Journalistic hyperbole?  Quite probably.  However, the benefits of creative activity helping your mood is not new. Alys Fowler has written recently about how gardening can have a positive effect on mood.  Monty Don is another gardener who talks about the pleasure of gardening, and has written that "Gardening should, first and foremost, be a pleasure.  If you are not enjoying it then you can be pretty sure that you are doing something wrong".

I try to take the same attitude to the things I do; that when sewing, baking or whatever activity it may be, I am doing it for my own enjoyment.  Once it stops being something that I take pleasure from and instead becomes a source of frustration and failure, it is time to take a break.

Maybe the benefit comes from focusing the mind (similar to the technique of mindfulness).  There is also a meditative quality that comes from the repetitive action of sewing or stirring ingredients together.  It is an opportunity to slow down and focus on what you are doing in that particular moment.

Knitting can be a way to find calm after a busy day - counting stitches instead of sheep!
The words "slow down" are important.  I enjoy baking when I can do it at my own speed, pottering about the kitchen with the radio on in the background.  I think this is why I like baking but find cooking horribly stressful - a meal has to be ready at a particular time, and all the elements have to be ready.  You can take as long as you want to make a cake, it's not going to spoil, and is not normally being done to a particular deadline (I make most of my cakes the night before they are going to be eaten).

And let's face it, creative activity can also be about positive reinforcement, an opportunity to think "wow, look what I can do".  I'll be the first to admit I haven't always been good at recognising my own achievements, but I am trying to get better at this.

There is one big proviso though - it doesn't matter if what you try doesn't work. Baking, sewing or any other activity will never be an aid to improving your mood if you start your task expecting perfection. But pausing to enjoy the process can be its own reward, regardless of the results.  The best thing we can create is a calm mind and a sense of contentment.

Ok, so this is a little bit decadent, but sometimes its nice to spoil yourself - chocolate cupcakes topped with my favourite chocolate?  Oh go on then...


Saturday 6 July 2013

Knit one, purr one

Oh dear, more than a week on since my last post and still no new finished project to bring you I'm afraid.  Not that I haven't been busy; here's a sneak peak of a tablecloth I'm working on...


My most exciting news from the past week is that I have a new house-mate - a black cat called Leonard.  He was abandoned by his owners and lived as a stray for a while before ending up at Battersea Cat Rescue, which is where I met him.  He's a really soppy boy, who loves his food and being fussed.  Having him in the house really makes it feel like a home.

He's getting quite comfortable, and loves sitting next to me on the sofa, curling up on a dining chair next to me as I work, or getting comfy on the armchair.  I don't have the heart to discourage him, but of course the downside is the hair he leaves behind!  So I'm covering everything in old towels and blankets.  Which reminded me...


At the end of last year I started knitting small squares to practice different knitting patterns.  The arrival of Leonard has prompted me to get out my knitting needles again - my plan is to make lots of patterned squares which I can then join together to make a blanket for Leonard to curl up on and which will hopefully protect my furniture!  However, there is a flaw in my plan - well, have you ever tried knitting with an inquisitive cat nearby?


I'll keep you updated on progress...


Monday 24 June 2013

A pair of hares


Lately, the mists of guilt have started to descend whenever my thoughts turn to this blog; but then I remind myself that "not perfect, but good enough" goes for the writing of this blog just as much as it does for any of the "makes" I post about.  I make no claim to be a prolific or conscientious blogger; my aim is to share ideas, to strengthen my belief in the joy of creativity over the search for perfection, and to hopefully inspire you to put a little time aside to get creating.  

Having made my excuses, I was about to say my problem is that I have too many projects on the go, but a more positive way of looking at this is that there are several things I am working on, all of which I'm enjoying, and I'm looking forward to sharing them with you eventually.  This isn't a race and I'm not setting myself monthly quotas of projects to complete.  So you'll have to bear with me I'm afraid.

Which means that for the second time running I'm bringing you a project from the archives.  This cushion was another Christmas present, this time for my mother, who has a liking for pictures of hares.  So during a stay with the P's I made a sketch of a hare from a card M had received.  When I got home I then scaled this up (drawing grid lines to help me) to make my template, based on which I sketched the opposing hare.  For someone who is not an artist I'm pleased with the templates I produced - they actually look like hares!

I think the red fabric for the hares works really well.  I took care when placing the templates to position the circles in the pattern to be eyes.  Like the teapot, the appliqué was fiddly - I had given myself some difficult angles.  I think this project would have been easier if I had used Bondaweb (an adhesive which you can buy in sheets and use to bond fabrics together by ironing), and I will certainly consider using it if I attempt a similar project in the future (in fact I've been using it in one of my current projects and have been impressed with it - hopefully I'll be able to share the results with you soon!).

I have to say I'm really rather proud of this cushion.  I think the combination of fabrics is striking, and would fancy making a series of cushions using these - a squirrel and a stag's head are two images that I think would work well.  But maybe I should try to finish at least one or two of my current projects before making a start down this road...

M loved her present, which really was the most important outcome.  It is a special thing to be able to give something you have made to someone you love - not only are you giving them the "thing", tailor-made to them and a product of the relationship between you, but you are also giving them the time you spent.  I got a lot of joy from making this cushion, knowing how surprised and pleased M would be.  The cushion is now proudly displayed in her living room.