Sunday 30 September 2012

Between the pages


At a craft fair this summer I saw old hardback books being used to hold business cards.  I loved the idea, so thought I would try it out for myself.

These are incredibly easy to make and I think they look really effective holding a couple of postcards.  All you need is an old hardback book (which you can pick up very cheaply from a charity shop), something to decorate the covers and a little bit of time.  Do think about the quality of the book you are buying - the ends will be on display so have a look at these e.g. is there any discolouration.  Also, think about the colour of the hardback cover, as this will be seen on the edges.

Fold each page in half (a good job to be done in front of the TV).  Then choose your decoration for the insides of the covers.  I went with some pretty Cath Kidston writing paper, but you could use recycled wrapping paper, stickers, or even fabric.

I think these are a great make - simple and relatively quick - and they have a certain charm without being too homespun or twee.  They may become my go-to craft for birthday presents - you have been warned!

Monday 24 September 2012

They're not Betty's, they're mine...


Scones have to be one of my favourite treats, whether for elevenses, afternoon tea or supper.  I have long wanted to have a go at making them, but have hesitated because of the fear that I would make a mess of these delicious bites.  I decided this could no longer hold me back; I mean, who ever heard of anyone being afraid of a little thing like a scone?!  Luckily, I could call on the superior baking knowledge of my friend Maud, who reliably advised me that the Betty’s recipe for scones is the best of those she has tried.

I had read in another recipe book of adding blueberries and lemon zest to scones, and could not resist giving it a try (although I know it may seem sacrilegious to think you could ever improve a Betty’s recipe!).

I often use visits from the parents as an opportunity to try out new recipes.  I’ve had no complaints yet as a result of casting them in the role of guinea-pigs for my culinary attempts!  I have to admit the scones were rather yummy, and they went down well with the Ps.  Using blueberries and lemon means there is no need for jam.  The lemon gives the scones a refreshing flavour and given that blueberries are a super-fruit, surely eating one of these scones must count as one of your five-a-day?

So I finally got up the courage to make scones, and even to put a little twist on them.  Not only were the results yummy, they've also given me a smidgen more confidence to be open to future adventures in the kitchen.

You can find the Betty’s recipe in their book A Year of Family Recipes.

The Great British Book of Baking contains a recipe for blueberry and lemon scones.

Thursday 20 September 2012

A Trip Around the World


Having completed my first quilt, the prospect of starting the next was a little less scary.  When I heard the news that two of my close friends were expecting their first child, I quickly decided that I wanted to make a cot quilt for when the new baby arrived.

Choosing the fabrics for this quilt was really fun.  I went with bright, sunny fabrics, which would be suitable for a girl or boy.  I wanted to include a nursery pattern, but nothing too cutesy, so I was really pleased when I found this red alphabet fabric at Doughty's shop in Hereford.


This pattern is called Trip Around the World.  The new parents are keen travellers and so I thought this would be a perfect pattern to adorn a quilt for the new addition to their family.

As I was on a deadline, I decided to make this quilt by machine rather than by hand to ensure I had it finished in time.

I made this quilt using the strip-piecing method.  There are already plenty of instructions on the internet for this pattern, so I won't try to explain the detail here when others have already done a much better job than I could hope to.  For an example of instructions with useful diagrams, see this so-called "idiot's guide".

This method involves sewing strips of the fabric together to form a complete loop.  This loop is then cut widthways, so you are left with loops made up of squares of each of the different fabrics.  The trick is to then unpick these loops so that you have strips made up of the different fabric squares sewn together.  These are then sewn together to build up the pattern.

Making this patchwork top by machine meant it grew fairly quickly, and it was really pleasing to see it progressing.

For the quilting, which I also did by machine, I decided to use a basic pattern of straight lines to emphasis the diagonal lines of colour on the patchwork top.  It also makes a pleasing pattern on the reverse of the quilt.

I have written previously about my first attempt at mitered binding.  This was my second attempt, and I think I can see improvement, which is always encouraging. 


Making this quilt was not without its frustrations.  I always want to do things well, and this time I particularly wanted to do a good job as this quilt was going to be a present.  It was frustrating when the seams of some of the squares did not match up perfectly, or the machine quilting did not stay true.  But this is the nature of quilting, and something I need to accept if I am to be a quilter.  Making this quilt has helped me accept this.  It is lovely to be able to make something for a special new baby, and my friends are really pleased with the quilt.  Being able to make things for people you care about is a wonderful thing.  Thinking about it this way helps me realise that projects like this really aren't about striving for a perfect make.  They are about the time and thought invested in them.  And I am not going to let a bit of frustration over minor mistakes stop me making things for the people I care about.

The finished quilt measures 86x100cm approx.

Saturday 15 September 2012

Bunting - not just for special occasions


It's been a busy summer for bunting, from the Diamond Jubilee to the great British Sporting Summer.  At a stretch, the patriotic bunting can probably be left up until after the Last Night of the Proms, but any longer is probably pushing it.

But I don't think the end of the summer means we have to pack up the bunting for good.  There is something about seeing bunting hanging up that lifts the spirits with its positive associations of celebration.  I have long wanted to make my own bunting, but (like so many other projects) finding the time is another matter.

Below are two bunting projects I have recently completed.  They are simple to do, relatively quick and the possibilities to adapt them are endless.  You don't need a sewing machine, or even a needle and thread.

Welcome bunting banner
This project actually started with the ribbon.  Having bought some pretty ribbon in a Cath Kidston sale, I was thinking of how best to use it.  It didn't take long to decide that it would be a lovely starting point for a welcome bunting banner.

First, I measured a template for the size of the bunting triangles (16x19cms approx) and cut these out ready to decorate.  Once I had decided the size of the bunting triangles I could make the stencils.  I started by sketching out the letters and pictures.  Once I was happy with the design of these, I traced these sketches onto card.  Then came the tricky bit: cutting the patterns out.  A steady hand is needed!


I used a sponge and watercolour paints, choosing bright shades to complement the colours in the ribbon.  Once dry, I laid out the triangles, cut the ribbon to the required length and stapled the triangles to the back of the ribbon.  The triangles overlap slightly behind the ribbon.


This bunting is not perfect, but I am really glad I tried.  There is the odd touch of paint where there shouldn't be, but letting that go, the overall effect is rather jolly.  I was a bit worried that once finished this bunting would look twee, but I think it manages to avoid that.
 
 
I have to admit that I am particularly pleased with the teapot and tea cup prints, which look more effective than I had anticipated they would.  Using repeats of these two images could potentially make some lovely bunting - possibly a future project!
 

Over time you can gradually build up a good collection of home made stencils.

Stencil bunting could be great for displaying a Happy Birthday message, or putting a child's name on their bedroom door.


Literary bunting


A craft fair I visited this summer had lines of bunting decorated with limericks hanging from the ceiling in a nod to a local poetry festival.  I liked the idea of decorating bunting with text and thought I would try it out for myself at home.

As I intended to hang the bunting between my kitchen and dining area, I decided to go with a food theme.  I had a lot of fun going through books to try to locate passages that I half-remembered.  There were lots of passages to choose from, and the final line-up includes text from Wodehouse, The Wind in the Willows, Swallows and Amazons, Gerald Durrell, the Worst Witch and Winnie-the-Pooh.
 
This bunting is very easy and quick to make.  Having drawn up a template so I knew the size of the triangles I had to fill (15.5x18cms approx), I typed up my chosen extracts so that I could influence their layout on the page (if layout is not a concern time could be saved by scanning the pages instead).  These were then printed onto card and the triangles cut out.  I cut out the bunting triangles so that the text appears at different angles on a couple of the triangles. 

Again, the possibilities are endless.  Decorate bunting with favourite recipes for the kitchen, nursery rhymes for a child's room or Christmas carols to add to a festive atmosphere.

So go on, hang out the bunting!

Monday 3 September 2012

A quilter at last


This is not the first patchwork quilt I’ve started, but it is the first one I’ve finished.

I fell in love with patchwork quilts on a trip into Amish country as an impressionable teenager during a family holiday in the USA.  I came back from that holiday and immediately ordered a book about patchwork.  It would be a few more years before I started my first quilt (a log cabin design which over ten years later I still haven’t finished).  When I was given some gorgeous vintage fabrics for Christmas I knew that I wanted to try patchwork quilting again.


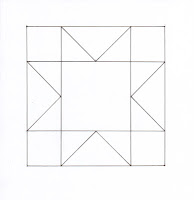
For some time I had wanted to try the Ohio Star block and leafing through some old patchwork quilting books I found a lovely design for a small quilt using a combination of a variation on the Ohio Star block pattern and a framed Nine Patch block pattern.   

This is a simple variation of the Ohio Star pattern block. Click here if you would like to read a brief history of the Ohio Star Quilt on ehow.com.


The finished quilt measures 57x57cm

Like any budding quilter I have managed to accumulate a stash of fabrics over the years, either through unwanted fabric donated to me by others or fabric left over from my previous projects.  A quick rummage through my collection uncovered the dark blue fabric used to frame the Nine Patch blocks and which is also used as the backing fabric.


 As this was my first attempt at quilting (the sewing together of the three layers) I decided to keep the quilting design straightforward and so I used a simple grid design, crossing in the centre of each patchwork block.


The quilting pattern stands out on the back of the quilt


All the sewing was done by hand, except the binding, which was machine stitched to the front side, then folded over the raw edge of the quilt and hand sewn to the back.  Mum taught me how to do these mitered corners.  I still have some practice to do to get them perfect, but for a first attempt (with more than a bit of motherly assistance!) I'm rather pleased with them.

If you want to try this binding technique there is guidance on this quilting website explaining how to sew mitered binding, including these mitered corners.

This quilt is not perfect – the lines don’t always match up as they should and putting the binding on didn’t always go to plan.  But once I stopped scrutinizing the details, took a step back and let go of those criticisms, I found that I was pleased with the overall effect and, dare I say it, a tiny bit proud of my first little quilt.  And yes it may be small (I don’t know that it would even qualify as a lap quilt!), but I think the fact that I actually managed to finish this one just goes to show that taking baby steps can lead to beautiful results sometimes.

It's been 15 years since I fell in love with quilts and having finally completed one I feel I have at last earned the right to call myself a quilter.  And seeing as my infatuation with quilts started when I was staying in Ohio, it seems fitting that my first completed quilt should include a variation on the Ohio Star block.