Showing posts with label sewing. Show all posts

Tuesday, 24 December 2013

Christmas makes

I know I haven't posted in a while, but I can assure you it's not because I've been idle!  I've been working my socks off this past month to try and get everything made in time.  Unfortunately, I was a bit over-ambitious about what I could achieve in the time available, so some makes are going to have to be presents for next year!  But now it's Christmas Eve, so I thought I would reflect on what has gone well.

I'm really pleased that I managed to make reindeer decorations for just about everyone I had been planning on giving one to.  Everyone who has had one seems to like them, so I'm happy.


cabling
I'm rather proud of this hot water bottle cover that I have knitted for my Nana.  This was my first real attempt at a cabling project, and the final result is better than I had hoped.  I know she is going to love it, and as a granddaughter I get great pleasure from being able to give homemade gifts to grandparents.  I only have two grandparents left, and they are incredibly important to me so I like to be able to make a fuss of them.

I actually found the pattern for this project in a knitting magazine I bought in a charity shop for 50p - another small victory for charity shop browsing!


I have previously posted about the Christmas fabric that M gave me.  I used this, along with unbleached calico, to make Christmas bunting.  I have to admit that I am really quite proud of the result.  I hope to make more for next year.
bunting

bunting

Wishing you all a very Merry Christmas.

Friday, 6 December 2013

Christmas decorations - reindeer

Dasher, Dancer, Prancer, Vixen, Comet, Cupid, Donner, Blitzen and, of course, Rudolph.  Reindeer are very much a part of Christmas tradition.  This year I decided to use a reindeer as the design for my felt Christmas decorations.

I previously shared with you some early prototypes of my felt reindeer decorations.  I've now refined and finalised the design.  As I had hoped, pipe cleaners solved the droopy antler issue, and I've also rounded off the ears slightly (a good dose of artistic licence was used in the making of these decorations!).  I hope you like the final result...

reindeer
 
 
If you want to have a go at making these, you'll need:
  • brown felt (there are lots of websites selling felt, I used Colour-Full Felt)
  • ribbon (about 8" per decoration, longer if desired)
  • black buttons
  • red buttons
  • thread - brown, black and red
  • pipe cleaners
  • stuffing (such as this soft toy filling from John Lewis, or you can use scraps of felt cut up into small pieces)
  • the templates
The ribbon and red sparkly buttons I used came from John Lewis.  The black buttons and pipe cleaners I sourced from Hobbycraft


reindeer template
The head measures approximately 3" (h) x 3 1/2" (from tip-to-tip of ears);
the antler is approximately 3" in length.
* Start by cutting your pieces from the felt, using the templates provided.  You'll need two head pieces and four antler pieces per decoration.  You may find it easier to cut the pieces for the antlers slightly wider then the template (you can then trim these after you have sewn them together).

* Sew, by hand, the buttons for the eyes and nose into place on one of the head pieces.

* Take two antler pieces, lay one on top of the other and, using a sewing machine if you have one, sew carefully around the edges.  Leave a gap at the bottom of the antler so you can insert a pipe cleaner.  Repeat with the other two antler pieces.

* Take one of your antlers and use a pencil or something similar to open up the gap at the bottom of the antler and insert a pipe cleaner, trimming it so it is the length of the antler.  If you find that the pipe cleaner is catching on the inside of the antler, fold over the tip of the pipe cleaner so that there is no sharp wire exposed.  The pipe cleaner should then slide into place, all the way up to the tip of the tallest antler.  Trim the edges to the antler to neaten as desired.  Repeat with the other antler.

* Take the undecorated head piece and lay it on the table.  Place the two antlers on top, between the ears.  Take an 8" length of ribbon, fold, and place between the two antlers.  Then lay the head piece decorated with buttons on the top (correct side up).  Effectively you have a sandwich: the raw edges of the antlers and the ribbon should be sandwiched between the two head pieces.  Pin the ribbon and antlers into place.

* Starting from near the bottom of the head, sew around the edge of the head pieces (use a machine if you have one).  Remember to leave a small gap (about 1") at the end.

* Trim the edges if needed.  Stuff the decoration, using the flat end of a pencil (or something similar) if needed to gently work the stuffing into the ears.  When you are satisfied that it is sufficiently stuffed, sew up the gap by hand using backstitch.

And there you have it, one Christmas reindeer to hang on the tree.

Monday, 11 November 2013

Christmas decorations - the planning stage

I haven't posted recently, mainly because I have various projects on-going at the moment and none quite finished.  But I thought I would share with you some previews of what I'm working on...

For me, October is when I start thinking about Christmas.  The leaves are turning, the scarves and gloves come out, I'm humming the tune of "Autumn Days" to myself on my way to work - and I start to plan my Christmas projects.

Like everyone, I have my traditions.  Watching The Snowman, ice-skating in London, watching the Muppet Christmas Carol in German (my friend's German and it's her copy, so not quite as random as it first sounds!).  And now there are my felt Christmas decorations - a different design each year.  This is the fifth year I will be making decorations.

reindeerAs I have quite a bit of brown felt left over from previous decorations (robins and Christmas puddings) this year I decided to have a go at reindeer.  I've made a couple of prototypes but still need to do more work to refine the design.  You've probably noticed one flaw - droopy antlers!  I'm working on a solution...

I'll share the next round of prototypes with you, and when I've decided on the final design I'll post the templates.

I'm also thinking of making some Christmas bunting; my Mother very kindly gave me some Christmas fabric left over from a quilt she made. 

Wednesday, 9 October 2013

chicken doorstop

A quick one - the Guardian website has a great archive of makes, including this chicken doorstop.  The instructions suggest filling with rice, but I was worried about attracting mice so filled mine with small stones (sand would also do the trick...).  I used a shirt bought at a charity shop; the red fabric and buttons I already had.  I made this for the P's, who were very pleased with it.


Sunday, 1 September 2013

Baby name bunting

This weekend I had the joy of joining some friends as they celebrated their little boy's first birthday. I wanted to make something as a present, and I decided I would try to make some personalised bunting, decorated with their baby's name.  Fortunately the result was as good as I could have hoped for.


I have written previously about my attempts at making bunting from card.  This time I went for fabric bunting, using calico for the triangles. I had some fabric left over from the cot quilt I had given my friends the year before when their son was born, and I used this fabric for the lettering.

If you want to have a go at making something similar, the process is pretty straightforward:

* Decide on your size of triangle - this will dictate the size of your letters.  Make a template.  Draw and cut out (remembering to leave seam allowance) your triangles from the calico.  I find tailor's chalk really helpful for this.
* Draw and cut out templates for your letters.  Think about whether you have anything that can help you with this - I used a cookie cutter to help me with the star (I had to scale down the size a bit).  Once you have the templates for the shapes, cut these out from the fabrics you have chosen (think about choosing colourful fabrics that will stand out against the calico).  Small scissors help here!  I never throw away templates - you never know when they will come in handy.
*  Attach the letters to the calico triangles.  I used Bondaweb for this; I found it made the appliqué process a lot easier than my previous attempts at this skill, and I think it makes for a neater result.  It's very easy to use.  Using your templates you draw and cut out the shapes you need from the Bondaweb, iron these onto the back of the fabric pieces, peel off the backing and iron the pieces into place on the calico triangles.  Keep the edges neat by overcasting on a sewing machine.
* To make each bunting flag, take one decorated triangle piece and one plain triangle piece, lay right sides together, pin and sew along the two side edges (not the top).  Trim the edges, especially around the point, press the seams, and then pull through.
* I made my own binding to sew along the top of the bunting flags, but you can buy bias binding, or you could use ribbon.  I pinned this in place, folding it over the top raw edges of the flags, carefully lining up front and back edges, and then machine stitching into place.

I am really pleased with the finished result, and this will certainly be a project that I will be trying again.


Sunday, 18 August 2013

Large nine-patch quilt - stage 1

I've started work on some bunting today - can't tell you more at the moment because it's going to be a present.

What I can share with you is the news that I have finally (having started them last summer) finished all 16 of the framed nine-patch blocks for a large quilt I am planning.  There is still a lot to do, but this is a very pleasing milestone to have reached.

quilting


Oxfam used to sell recycled cotton squares (part of its Ethical Collection). I was so taken with the patterns, I bought several packs with no particular project in mind and put them away in my sewing basket for the proverbial rainy day.  When I set myself the challenge of making a banner for my friend to take with her when she went campaigning for the group Women for Whales, the blue and white patterened squares were perfect for a whale.

I knew I wanted to use the rest of the squares for quilting, but the question was what patchwork design.  I toyed with various ideas, but in the end I went for nine-patch blocks.  I felt that these were the best use of the fabric as this design made the most of the pre-cut squares and was the best way of showing off the varied, fabulous patterns.

The idea of framing the squares came later (an idea from my Mother), and for this I used unbleached calico.  I think it frames the squares perfectly.  You can buy pre-washed calico quite cheaply - I got mine from Doughty's.


quilting
Excluding seam allowance, each framed block measures 40x40cm

The next step will be to quilt each square before joining them together.  I did the patchwork by hand, but I may do the quilting by machine.


quilting

There are still decisions to make - what quilting design to use, what to use as a backing fabric, and what fabric to choose to join the squares.  As ever, I'll let you know how this project progresses...


Sunday, 4 August 2013

Clothes peg bag

A relatively straight-forward, quick project this time.  I don't know why, but there was something that felt very grown-up about getting my own washing line.  Putting it up was just another one of those little things that goes towards making the house feel like my home.

A clothes line needs a clothes peg bag, so I took a break from working on my tablecloth to have a go at making my own.  I remembered that this was one of the projects in the Cath Kidston book Sew! a friend had given me a while ago (and which I have mentioned before on this blog) and I used this project as a basis for making my peg bag.

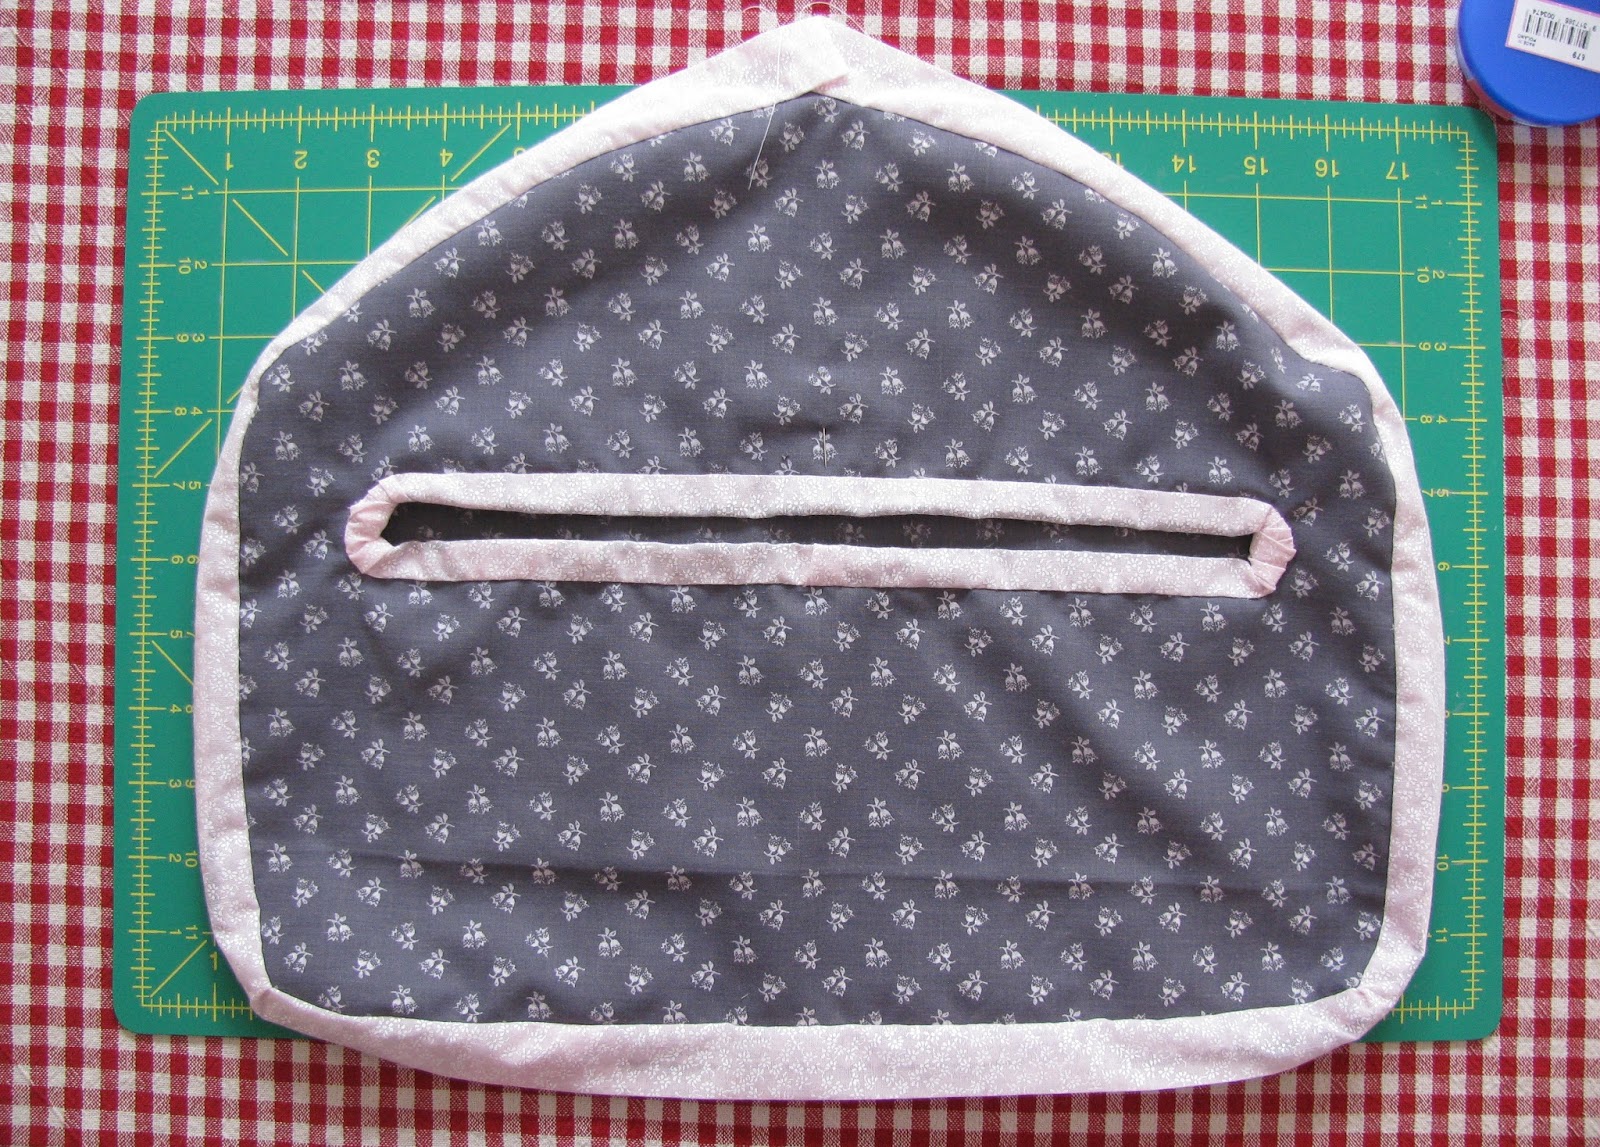
It was very helpful to have instructions on which to base my design, although I didn't follow these exactly.  For example, in Sew! the pattern is based on using a 30cm coat hanger, and it suggests that if you can't find a hanger of that size you could shortern a standard hanger by using a hacksaw to cut it.  I didn't really fancy trying to cut bits off a plastic hanger, so I used a standard wire hanger and drew my own template based on this.  Using a wire hanger was a benefit when it came to inserting it into the bag at the end, as it is malleable and could be moved into place easily.


The bag measures approximately 41cm (w) x 33cm (at the highest point)


I'm really pleased with the final result.  And because I already had the fabric (which in fact had been given to me some years ago) and used an old wire hanger, I've got this lovely clothes peg bag at no cost, except the couple of hours I spent on it, spread over two weekends.  So lots to smile about.  I've already been putting the bag into use and as a home-made addition to the ritual of hanging out the washing I'm glad I invested the time to make my own.

This is an easy, quick project and I would urge anyone to have a go.  I used a sewing machine, but it isn't necessary (it would just take a bit longer to do it by hand, but not much).  There are lots of ways you could embellish the basic design.  For example, if I were to make another clothes peg bag I would think about adding letters (in the same fabric as the binding) to spell the word "pegs" across the front of the bag.

Here's how I made the bag:


Using the hanger as my starting point, I drew a paper template and cut out two pieces of fabric.


I made bias binding by cutting strips of fabric, cutting the ends on the diagonal (45 degrees) and sewing these together, then folding and pressing the edges.


I cut a narrow slit in the front piece.  I first pinned the bias binding into place around the slit on the right side of the fabric, folding it into pleats at the corners.  Having sewn this into place (by machine), I folded the bias binding over the raw edge and hand stitched the binding into place on the wrong side of the fabric.

I found the folded corners very tricky, and they could be neater.  I think next time I would try to think of a better way to do the corners (e.g. two straight strips of binding rather than trying to go around such tight corners).

The next step was to join the two pieces of the bag together.  I lay these pieces down wrong side to wrong side.  I pinned the bias binding into place around the edge (pinning through all three layers of fabric), starting from the top (so as to leave a gap for the hanger) and putting small pleats in at the two bottom corners.  I machine stitched this into place, sewing through all three layers (the bias binding and the two main pieces).


I then folded the binding over the raw edge and hand stitched it on the back of the bag, before the final step of inserting the hanger.

Thursday, 18 July 2013

Tablecloth with bird applique - stage 1

A small success - I have completed the edging on the tablecloth I am working on.


The tablecloth is a length of cotton sheeting, which I cut to size for my dining table.

To add the edging, I followed these steps:

I hemmed the raw edges of the cut sheeting to prevent fraying.  This was probably not strictly necessary and if I ever carry out this project again I would think about missing this step.  The picture shows the "wrong" side of the tablecloth.

I wanted to use a mix of fabrics for the edging, so I cut small lengths of fabric which I then joined together to create one long strip.  I pressed the seams and also folded and pressed the edges.

This is a picture of the "wrong" side of the tablecloth taken after I had sewn the strip of edging to the "right" side of the tablecloth.  I did this by placing the strip of edging, right side down, on the right side of the tablecloth.  I then used my machine to sew these together (the top line of sewing in the picture), folded down the edging to reveal its "right" side and ironed along the sewn line.

On the back, I hand stitched the edging, sewing along the fold to create a neat edge and making small, hidden stitches.


I am pleased with my neat corners.

The next stage will be to add the birds (a few of which are pictured below). You may recognise the shape - I used the same Cath Kidston template on this cushion and as a basis for my Christmas robin.  I used Bondaweb to help attach the wings; it's easy to use and I am pleased with the results.  I'll be using Bondaweb to help fix the birds onto the tablecloth.  And of course I will share the results with you as soon as I am done!


Sunday, 14 July 2013

Creating a better mood


Lemon drizzle loaf cake: easy to make, and the combination of lemon zest, juice and sugar provides a sweet, zingy lift to any day; it's a joy to prepare as well as to eat.

"They say baking soothes the soul" 

Interesting article in the Guardian last week about whether baking can improve mental health.  Journalistic hyperbole?  Quite probably.  However, the benefits of creative activity helping your mood is not new. Alys Fowler has written recently about how gardening can have a positive effect on mood.  Monty Don is another gardener who talks about the pleasure of gardening, and has written that "Gardening should, first and foremost, be a pleasure.  If you are not enjoying it then you can be pretty sure that you are doing something wrong".

I try to take the same attitude to the things I do; that when sewing, baking or whatever activity it may be, I am doing it for my own enjoyment.  Once it stops being something that I take pleasure from and instead becomes a source of frustration and failure, it is time to take a break.

Maybe the benefit comes from focusing the mind (similar to the technique of mindfulness).  There is also a meditative quality that comes from the repetitive action of sewing or stirring ingredients together.  It is an opportunity to slow down and focus on what you are doing in that particular moment.

Knitting can be a way to find calm after a busy day - counting stitches instead of sheep!
The words "slow down" are important.  I enjoy baking when I can do it at my own speed, pottering about the kitchen with the radio on in the background.  I think this is why I like baking but find cooking horribly stressful - a meal has to be ready at a particular time, and all the elements have to be ready.  You can take as long as you want to make a cake, it's not going to spoil, and is not normally being done to a particular deadline (I make most of my cakes the night before they are going to be eaten).

And let's face it, creative activity can also be about positive reinforcement, an opportunity to think "wow, look what I can do".  I'll be the first to admit I haven't always been good at recognising my own achievements, but I am trying to get better at this.

There is one big proviso though - it doesn't matter if what you try doesn't work. Baking, sewing or any other activity will never be an aid to improving your mood if you start your task expecting perfection. But pausing to enjoy the process can be its own reward, regardless of the results.  The best thing we can create is a calm mind and a sense of contentment.

Ok, so this is a little bit decadent, but sometimes its nice to spoil yourself - chocolate cupcakes topped with my favourite chocolate?  Oh go on then...


Monday, 24 June 2013

A pair of hares


Lately, the mists of guilt have started to descend whenever my thoughts turn to this blog; but then I remind myself that "not perfect, but good enough" goes for the writing of this blog just as much as it does for any of the "makes" I post about.  I make no claim to be a prolific or conscientious blogger; my aim is to share ideas, to strengthen my belief in the joy of creativity over the search for perfection, and to hopefully inspire you to put a little time aside to get creating.  

Having made my excuses, I was about to say my problem is that I have too many projects on the go, but a more positive way of looking at this is that there are several things I am working on, all of which I'm enjoying, and I'm looking forward to sharing them with you eventually.  This isn't a race and I'm not setting myself monthly quotas of projects to complete.  So you'll have to bear with me I'm afraid.

Which means that for the second time running I'm bringing you a project from the archives.  This cushion was another Christmas present, this time for my mother, who has a liking for pictures of hares.  So during a stay with the P's I made a sketch of a hare from a card M had received.  When I got home I then scaled this up (drawing grid lines to help me) to make my template, based on which I sketched the opposing hare.  For someone who is not an artist I'm pleased with the templates I produced - they actually look like hares!

I think the red fabric for the hares works really well.  I took care when placing the templates to position the circles in the pattern to be eyes.  Like the teapot, the appliqué was fiddly - I had given myself some difficult angles.  I think this project would have been easier if I had used Bondaweb (an adhesive which you can buy in sheets and use to bond fabrics together by ironing), and I will certainly consider using it if I attempt a similar project in the future (in fact I've been using it in one of my current projects and have been impressed with it - hopefully I'll be able to share the results with you soon!).

I have to say I'm really rather proud of this cushion.  I think the combination of fabrics is striking, and would fancy making a series of cushions using these - a squirrel and a stag's head are two images that I think would work well.  But maybe I should try to finish at least one or two of my current projects before making a start down this road...

M loved her present, which really was the most important outcome.  It is a special thing to be able to give something you have made to someone you love - not only are you giving them the "thing", tailor-made to them and a product of the relationship between you, but you are also giving them the time you spent.  I got a lot of joy from making this cushion, knowing how surprised and pleased M would be.  The cushion is now proudly displayed in her living room.


Wednesday, 15 May 2013

Not following the pattern...


Where has the time gone?  I've got lots of half-finished projects on the go at the moment (story of my life!), so I'm dipping into my "here's one I made earlier" pile...

A few years ago my friend Maud gave me the Cath Kidston book sew!.  We drooled over the pages, and of course I wanted to have a go at making just about every project described on its glossy pages.  Skip forward several years and I don't think I have actually faithfully followed any of the projects (I'm still working up the courage to try to make one of the bags!).  However, for me the real joy of this book has come from the inspiration it provides - and the very handy templates. 

One of the patterns in the book is for a cushion decorated with appliquéd birds.  I already had two cushion pads, which were covered in some curtain fabric found in an offcut bin; it was time for a change.  Their size didn't match the pattern, but I wasn't about to let that stop me.

I had some fabric that I had bought in The Viking Loom in York, not with a particular project in mind but (as I do more often than I should) with the intention that I would find a project to suit it.

I used the bird templates from sew!.  You may recognise the template - I tweaked it slightly to create my own template for my robin christmas tree decorations, which you can see here.

I made the covers using a combination of machine and hand stitching: machine for the basic pieces and hand sewing to appliqué the bird embellishments.  I improved with practice - the appliqué technique on the second cushion is definitely better. The trick is to run the thread inside the folded edge of the fabric and use small stitches, so your sewing is as hidden as possible.


I am sure there are some who would turn their noses up at the use of a manufactured template, but I say why not.  You can still inject your own personality into the final creation.  Just because you may not have the exact materials a pattern calls for doesn't mean you cannot still create something lovely - and what's more, it will be something no-one else has.

Thursday, 20 December 2012

Christmas decorations

Christmas is a time of tradition.  Watching the Snowman, making biscuits for the tree, shouting "oh no it isn't" at the panto; we all have our own.  A few years ago I started a new tradition of my own of making felt Christmas tree decorations for family and friends.  It's the perfect Christmas project - planning and making the decorations gets me in a festive mood, I love how pleased everyone seems to be when I give them their decoration and I get to do some sewing.


Over the past few years I've made hearts, robins and stars (very tricky).  This year was the turn of the Christmas pudding, adorned with holly leaves and buttons for berries.  They are simple to make, so I thought I would share.

You will need the following templates:

My pudding template measured 4"x 3" approx, but you can obviously size yours as you wish.
To make the decoration you will also need felt in brown, white and green, ribbon, buttons, stuffing and thread.
 
* Cut out two of the pudding and sauce pieces in the brown and white felt.
* Sew the white felt pieces (for the sauce) to the brown felt pieces.
* Place the two brown pieces together (wrong sides together).  Take a strip of ribbon (I find 8" is a good length for hanging on a tree), form a loop and insert the ends between the two pieces of brown felt.
* Sew around the edges of the brown felt pieces, leaving a small gap at the bottom (for the stuffing).
* Cut out four holly leaves from the green felt.  Position two of these on either side of the ribbon at the top of the pudding.  The ends of the leaves should slightly overlap.  Take your buttons and place over the ends of the leaves on both sides.  By hand, sew through from one button to the other, being sure to sew through the holly leaves and the pudding to secure all the pieces together.  You'll want to go over this a couple of times at leas.
* You're nearly done.  All you need to do is add stuffing and sew up the gap.  And you're done!  One pretty little Christmas pudding to hang on the tree.

These little puddings are not about perfection.  Their charm is that they look handmade.  So never mind any wonky edges.  Making something to give to people you care about brings a pleasure like no other.  And after all, giving is what this season is all about.

Merry Christmas!


Monday, 12 November 2012

Tea for two

Christmas lights are going on, I've started my Christmas shopping and the John Lewis Christmas advert is showing on TV.  Christmas is 42 days away and I'm feeling festive. 

I've started making Christmas decorations (more on that to come) and it got me thinking about Christmas presents I have made in the past.

This cushion is a present I am particularly proud of.  The execution may not be perfect, but it was the perfect present for this friend, who like me shares a love of textiles and tea.

I started by drawing the stencils to fit the size of the cushion.  I tried a few designs for the teapot, but this was the most pleasing.

I won't lie, the appliqué was fiddly, in particular the insides of the handles.  The stitching is not perfect and is not something to be examined too closely!  But I am pleased with the overall effect.  And no-one is more surprised than me that it actually looks like a tea pot!  The saucers were the most difficult to do and are the one thing I would do differently if I were to do a similar design in the future.

All in all, I am quite proud of this cushion.  Yes it was tricky, but I am all the more pleased that the overall effect works.  And there's nothing quite like the satisfaction that comes from putting in the effort to make a perfect gift for someone which you know they are going to love, imperfections and all.

Sunday, 21 October 2012

Seeing hexagons

I did say cushions would be a recurring theme on this blog!

This one was made with some gorgeous vintage fabrics given to me as a Christmas present.  Hexagons are  time-consuming, but I think the hours spent on this cushion were worth it.

I have to admit I did cut corners in the process.  You are supposed to cut out paper hexagons (I cut mine from old newspaper, but you can buy paper hexagons to save time if you want) and then tack the fabric patches around these paper templates so that each fabric patch holds its hexagon shape while you sew them together.  However, I found that ironing the fabric patches around the paper templates was sufficient to get them to hold their shape while I then sewed the edges together.  I took a fairly haphazard approach to this cushion, rather than organizing the hexagons in any pattern, which I think this was the right approach for this cushion.


This was also the first time I have put a zip into a cushion cover.  I did feel rather ambitious when it came to reaching for the zipper foot on my sewing machine, but it actually went ok.  The fabric is slightly warped in places along the edge of the zip, but the zip does zip up, so I'm happy!

Life is too short sometimes, and yes, I did take a shortcut; I didn't do everything you are supposed to do when working hexagon patchwork, but I don't think the final result has suffered for it.  So not perfect perhaps, but good enough!

Sunday, 14 October 2012

A cushion to comfort


A couple of weeks ago I asked what was important to you in a cushion: looks or comfort.  You clearly like to have your cake and eat it; a cushion without both looks and comfort is not worthy in your view.

This is not the most chic of cushions, but I like to think it has its own certain charm.

This is a cushion to hold your hand and comfort you; a cushion to be hugged and squeezed.  It's made from a favourite old pyjama shirt.  Years of wear had left the fabric lovably soft, but also meant that the pyjamas were close to falling apart.  They had been my favourite pair for so long I could not bear to part with them.  What better way to hold onto them than to turn them into a cushion?

I could have made a simple red tartan cushion, but I wanted to try to keep the look of the pyjamas and retain their spirit somehow.  To this end, I included the pocket and buttons of the pyjama shirt in the cushion cover.  I think using these adds some interest to the design.  I opted to sew up the front of the shirt, but if I were to attempt a similar project in the future I think I would use this to create a pocket - it could make a lovely case in which to keep pjs.

Thursday, 11 October 2012

Women for Whales


When a friend announced her intention to attend an event in support of Women for Whales (a campaigning group run by our surf instructor among others), it seemed a perfect opportunity for me to channel my creative enthusiasm into something which would have a broader purpose than just looking pretty.

I really liked the idea of using a technique that was a traditional woman's craft associated with the home and using it to create a banner that would be used in a women-led protest aiming to reach out and raise awareness.

A successful protest banner should attract people's attention and clearly convey what it is about.  I hope you agree that this design succeeds against those criteria!

The overall design looks deceptively simple.  The whale is made up of rectangles stitched together.  Oxfam sells packs of recycled cotton squares, taken from offcuts in textile factories, ranging in colour and pattern.  I had a few of these packs which I had bought for a rainy day (or rather until I came up with an idea on how best to use them) and so I raided these for blue cotton squares.

I started by sketching and cutting out the design of a whale on paper and cutting the square cotton patches in half to create rectangles.  These I separated by shade.  I was lucky that one of the pieces had a circle, which was perfect for the eye.

I arranged the rectangular pieces in lines over the paper whale pattern, trying to use those pieces with a white pattern to represent the underside of the whale.  These pieces were then sewn end-to-end to create long strips, which were then lined up side-by-side and sewn together.  The resulting patchwork was then trimmed to size and appliquéd onto the white sheet (I had already cut this to size and sewn a hem).

I kept the design of the letters simple to make life easier for myself.  I think the bold lettering works fine though, and at least is legible.  The orange fabric is something I had used as a sarong at one point, but hadn't been worn for several years.  I think the bright orange works well with the blue and the pattern of bright small flowers adds a feminine touch.

This banner got its first outing in Brighton, at the annual paddle round the pier event (the photo is one taken by my friend at Brighton Beach).  Women for Whales are continuing their campaign, so hopefully it will get a few more outings yet.

Oxfam's Ethical Collection recycled cotton squares can be bought here.

You can read about Women for Whales here.

Thursday, 20 September 2012

A Trip Around the World


Having completed my first quilt, the prospect of starting the next was a little less scary.  When I heard the news that two of my close friends were expecting their first child, I quickly decided that I wanted to make a cot quilt for when the new baby arrived.

Choosing the fabrics for this quilt was really fun.  I went with bright, sunny fabrics, which would be suitable for a girl or boy.  I wanted to include a nursery pattern, but nothing too cutesy, so I was really pleased when I found this red alphabet fabric at Doughty's shop in Hereford.


This pattern is called Trip Around the World.  The new parents are keen travellers and so I thought this would be a perfect pattern to adorn a quilt for the new addition to their family.

As I was on a deadline, I decided to make this quilt by machine rather than by hand to ensure I had it finished in time.

I made this quilt using the strip-piecing method.  There are already plenty of instructions on the internet for this pattern, so I won't try to explain the detail here when others have already done a much better job than I could hope to.  For an example of instructions with useful diagrams, see this so-called "idiot's guide".

This method involves sewing strips of the fabric together to form a complete loop.  This loop is then cut widthways, so you are left with loops made up of squares of each of the different fabrics.  The trick is to then unpick these loops so that you have strips made up of the different fabric squares sewn together.  These are then sewn together to build up the pattern.

Making this patchwork top by machine meant it grew fairly quickly, and it was really pleasing to see it progressing.

For the quilting, which I also did by machine, I decided to use a basic pattern of straight lines to emphasis the diagonal lines of colour on the patchwork top.  It also makes a pleasing pattern on the reverse of the quilt.

I have written previously about my first attempt at mitered binding.  This was my second attempt, and I think I can see improvement, which is always encouraging. 


Making this quilt was not without its frustrations.  I always want to do things well, and this time I particularly wanted to do a good job as this quilt was going to be a present.  It was frustrating when the seams of some of the squares did not match up perfectly, or the machine quilting did not stay true.  But this is the nature of quilting, and something I need to accept if I am to be a quilter.  Making this quilt has helped me accept this.  It is lovely to be able to make something for a special new baby, and my friends are really pleased with the quilt.  Being able to make things for people you care about is a wonderful thing.  Thinking about it this way helps me realise that projects like this really aren't about striving for a perfect make.  They are about the time and thought invested in them.  And I am not going to let a bit of frustration over minor mistakes stop me making things for the people I care about.

The finished quilt measures 86x100cm approx.