Monday, 30 June 2014

Learning to make bread - month six: grissini

bread sticks

The humble bread stick.  My first effort at these probably wouldn't impress any serious baker, but for my first attempt I was rather pleased with them.

An ever-reliable party nibble, the bread stick originates from Turin, and (according to Wikipedia) was apparently first made as far back as the 14th century.


Kneaded and ready to rise...
The recipe I used came from Linda Collister's "The Bread Book" (a gem I found in a charity shop).  Linda Collister is responsible for many of the recipes that appear in the Great British Baking series.  However, I would suggest getting your hands on a copy of her bread book if you can; it's very comprehensive and very user-friendly, even for a bread-making novice like me.


An hour later...
Linda Collister recommends that a slightly under-sized
dough is preferable to an over-risen one for this recipe
I couldn't resist experimenting with flavour, and tried sea salt, rosemary and chilli, as well as some plain (and some inadvertent combinations of the three!).  I added the seasoning as I rolled the sticks into shape.  While this worked well with the sea salt and chilli, I think the rosemary bread sticks would have been more successful if I had added the rosemary at the kneading stage.  As it was, the salt bread sticks were definitely my favourite.
 
Rolling out ready for cutting
 
bread sticks
Shaped and ready for the oven
These bread sticks would not win a competition for uniformity, but I like that as the lack of uniformity reminds me that these are homemade and, I think, adds to their charm.  What I would do differently next time though is to make each stick a little thinner and to cook them for longer.  These sticks did not have the "snap" that one would expect; however, they were delicious, and a perfect accompaniment to a mezze lunch.

A word on the sponge method
Collister's basic technique for bread-making includes a stage where you leave the batter to "sponge".  With the grissini, this stage comes after you have added the salt and yeast (I used fast-action dried yeast) - always remembering to add them on separate sides of the bowl of course - and poured the water and oil into a well in the middle.  The idea is to then draw a little flour into the liquid and then leave it to "sponge" for about 20 minutes - basically to become aerated and frothy.

This is the so-called "half-sponge method".  This is not a technique that I have used with any of the previous breads I have made.  I can't say that I was able to notice any discernible difference; however, I think to really notice the difference in flavour you would have to leave the batter to "sponge" for at least a couple of hours.  Dan Lepard's recipe for "the easiest loaf in the world" uses the half-sponge method (warm water, yeast and flour left for a couple of hours, or even overnight if possible).

Tuesday, 13 May 2014

Learning to make bread - month five: mini baguettes

With a weekend in Paris to look forward to, I decided to get in the French spirit by making mini baguettes for May's bread baking challenge.


A French supper - wine and French onion soup
 to go with a freshly baked baguette
The recipe is one from Paul Hollywood's bread book.  The only ingredients I didn't have was semolina (used to dust the baguettes before they go in the oven), but that didn't seem to matter.

I have to admit I was sceptical about how well these would turn out; as it happens, I think they are a strong contender for my best bread so far...

The dough for baguettes is very wet and sticky!
The recipe advises kneading the dough in a processor as the dough is very wet and sticky to start with.  Although my machine (a Magimix Compact 3200) has a dough blade, it did struggle with this dough.  I was able to start kneading the dough in the machine, but the dough travelled up the inside of the blade and jammed the machine(!), so I finished kneading by hand - felt a bit like handling chewing gum to start with, but rather satisfying to see the dough transform in my hands into something that could be shaped into a smooth ball.

The risen dough
Having left the dough to rise, its then knocked back, shaped, and left for its second proving.  I then dusted it with flour and cut it as instructed by the recipe before placing in the oven (with fingers crossed).


bread
Shaped, left for second proving, dusted, cut and ready for the oven
I needn't have been sceptical - the end product was two beautiful, delicious mini baguettes which we had warm for supper with French onion soup. 

Bon appétit!

bread
The baked baguettes, still warm and ready to eat
bread
Bon

Sunday, 11 May 2014

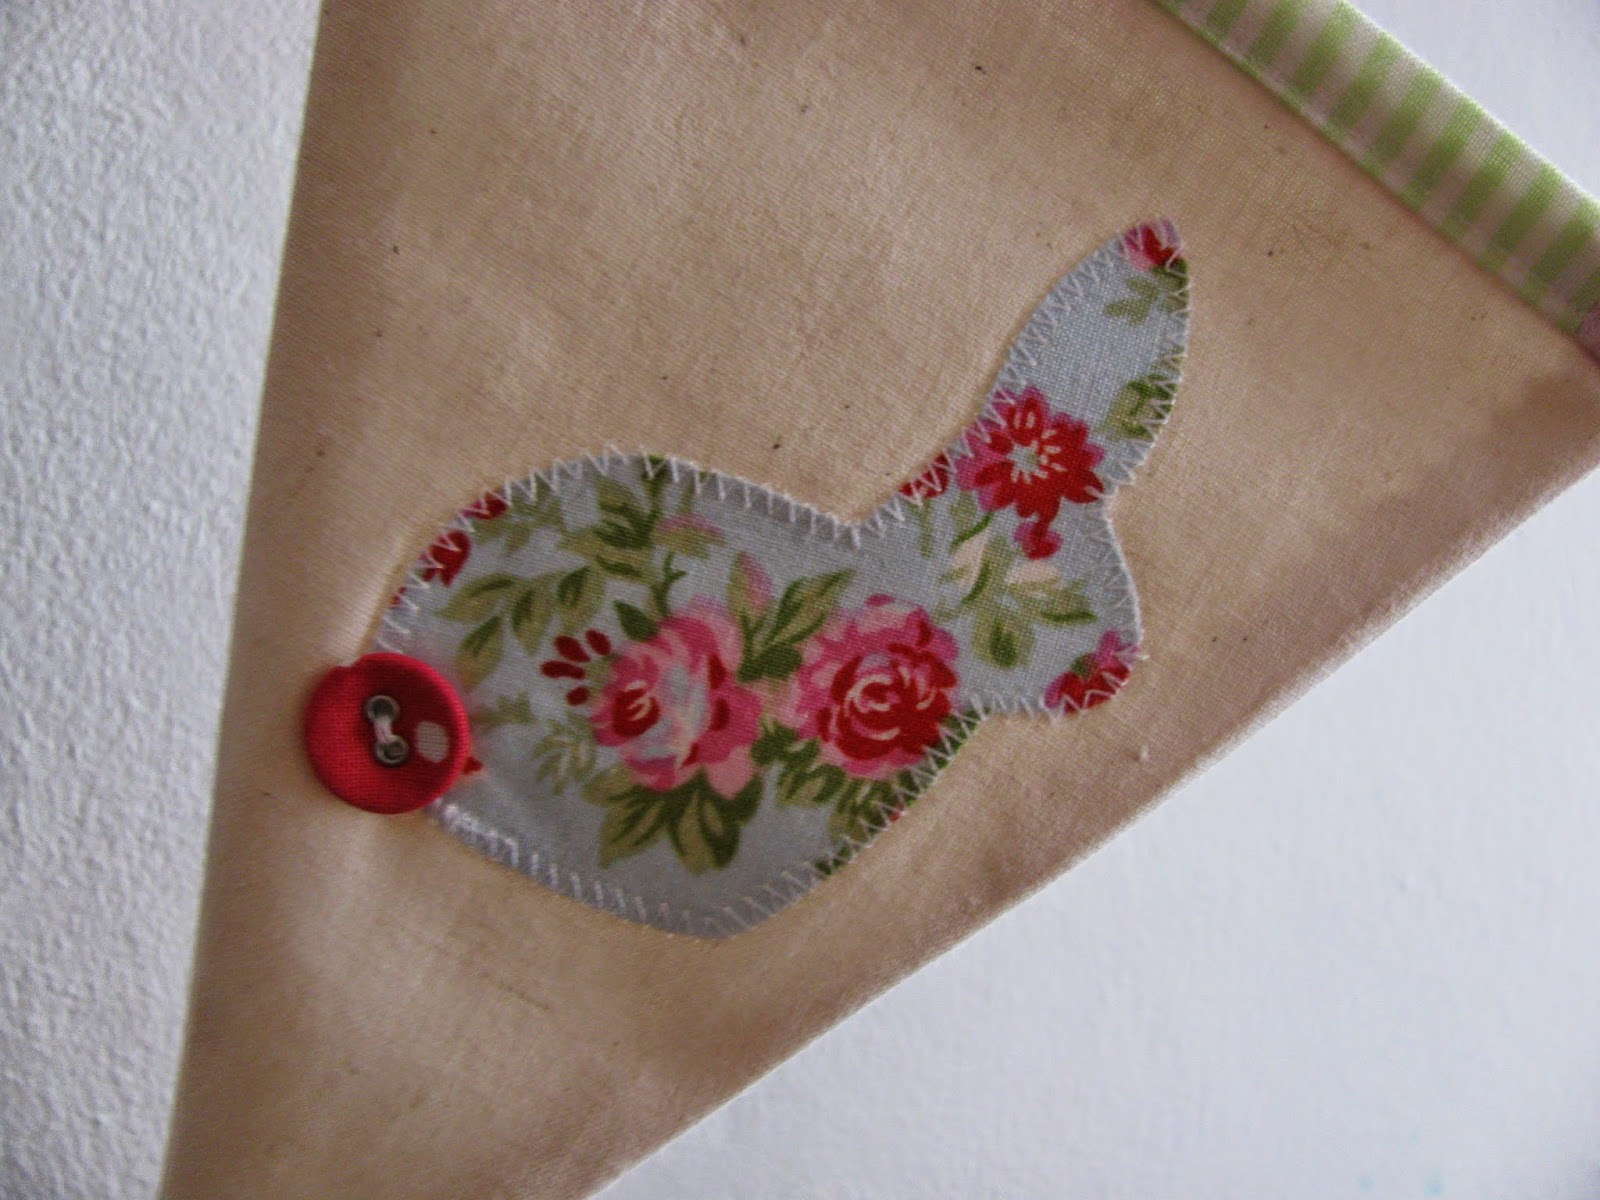
Easter bunting


Easter

A bit late, but I wanted to share with you this bunting I made for Easter.  The idea was a natural continuation of my bunting projects from last year (see my baby name bunting and Christmas bunting).


Cath Kidston
Cath Kidston buttons
I decided to use these Cath Kidston buttons (a Christmas present) for the tails - fortunately the pattern of the buttons went really well with some fabric I already had.


I've called it Easter bunting but we've still got it up - so perhaps it's better described as spring bunting!


Bunny template - the size I used was roughly 8.5cm(h) x 6.5cm(w)
bunny


Easter


bunting

 
bunting


bunting

Monday, 28 April 2014

Learning to make bread - month four: maneesh

flatbreadI will be honest, I had not heard of Maneesh before I came across the recipe in Paul Hollywood's Bread book.  It is, apparently, a classic flatbread from the Middle East.

To be a true Maneesh the dough should really be covered with za'atar, a mix of herbs and sesame seeds.  Not having any sesame seeds in my store cupboards, I improvised and went for a mix of thyme and rosemary.

 My first response when I took the bread from the oven was that my effort at this flatbread recipe was probably my least successful bread-making attempt so far.  A bit like Goldilocks, I ended up with one bread burnt on the bottom, another stuck to the paper, and a third that looked like it was probably just right.

However, I needn't have been quite so pessimistic; none of the three would win any beauty competition, but they taste really very good.  This is probably partly down to the sugar in the recipe and partly down to the thyme and rosemary on top.  The texture is nice and soft.  In all, a bread that is very easy to pick at - and one which can disappear quickly!

flatbread
 
So not my most successful bread-making attempt, but something I would do again.  Only next time, I think I will add another ingredient to the recipe: patience.  I think my results would have been better had I cooked the three breads in the oven one at a time rather than together.

flatbreadflatbread

flatbread
 

Sunday, 27 April 2014

Chocolate orange cake

As I have mentioned before, I have a particular like for chocolate orange as a flavour.  So when planning cakes to make for a gathering of my friends for my birthday, a chocolate orange cake was a natural choice.

Not being able to find a recipe, I decided to adapt recipes I did have for chocolate sponge and for chocolate frosting.

The chocolate sponge is based on Nigel Slater's recipe for a chocolate coffee cake - instead of 3tbsp of espresso coffee I added 3tbsp freshly squeezed orange juice and some orange zest to the cake mix.  The recipe makes a cake with a lovely texture, and this amount of orange worked well to give the chocolate sponge a yummy flavour, without the orange taking over.

For Christmas Mum had given me some Orange Blossom water, and this seemed a perfect opportunity to try it out.  I used it to flavour the chocolate frosting; it took a bit of trial and error (lots of tasting required!) to get the balance right - a couple of tablespoons seemed to do the trick.

Then all that was needed was some orange zest to brighten up the top of the cake.

This is a grown-up chocolate cake, in that it is not a sweet chocolate cake.  I love chocolate orange as a flavour, and I was a bit worried that this cake (which I basically made up based on nothing more than the fact that I really like chocolate orange) wouldn't live up to my expectations; I needn't have worried.  It was delicious and went down very well with my friends.  Definitely one to make again.

chocolate cake

Sunday, 13 April 2014

Learning to make bread - month three: hot cross buns


Perhaps not technically a bread, but the recipe requires yeast, so I say it counts.  I love hot cross buns; delicious and versatile, they can quite legitimately be eaten for breakfast, elevenses, afternoon tea, or supper - take your pick.  Hot cross bun season signifies that spring is well and truly on its way, and my bread-making resolution seemed a perfect opportunity to learn how to make them.  Easter being late this year, I thought nevertheless that the beginning of April was a perfectly respectable time to start baking hot cross buns (and gave me time to practice before Easter!).

I used the recipe from the Great British Book of Baking;  there's a Paul Hollywood recipe on the BBC website, the basics of which are similar, and Felicity Cloake compares a number of different methods to come up with her take on how to cook the perfect hot cross bun.

There's a good history of hot cross buns here.  It doesn't mention anything about ancient Greece or Rome though; according to the British Book of Baking, the ancient Egyptians offered similar small round yeast cakes to the goddess of the moon, and the ancient Greeks and Romans made them for the goddess of light; it was the Saxons, apparently, who added the cross.  There's a detailed reading selection on the history of the hot cross bun here.

The recipe I followed used mixed dried fruit, with nutmeg and mixed spice for added flavour.  Making these buns was a process that required time, but was well worth the wait; the buns are delicious.  I've already made a second batch and will be making more over Easter weekend; in fact, they are so good I may even have to extend hot cross bun season beyond Easter!


Ingredients mixed and ready for kneading
Kneaded and ready to rise


The risen dough is knocked back then divided into twelve buns
I left the dough for about one and a half hours to rise.  You then knock the air out of it, and divide into twelve buns, which you place on the prepared tray.  A large plastic bag is then placed over the tray and it is left for about 45 minutes, until the buns have about doubled in size.  However, the British Book of Baking explained that as an alternative you could put the tray (in its bag) in the fridge overnight.  I went for the latter, which then meant I had buns ready to go in the oven first thing in the morning.  All I had to do was add the cross.  This is made from flour and water, which forms a paste.  Rather than using a piping bag, I rolled small bits of the paste between my hands to make the lines which I then laid over the buns.

Glaze as soon as they are out of the oven
Still warm from the oven...what a treat.


Monday, 24 March 2014

Thaxted Sticky Tea Loaf

Three words to describe this tea loaf: sticky, fruity, delicious.  Spread some butter on it, pour a cup of tea and its the perfect accompaniment for your three o'clock tea break.

tea loaf
A slice of tea loaf - tea time sorted!
The recipe comes from a book given to my brother and me (my brother being my current lodger!) by some good family friends of ours who live in the beautiful Essex town of Thaxted.  The recipe book is called (pun alert!) "On a Chicken Wing and a Prayer", being a cookery book sold to raise funds for the ongoing restoration of Thaxted Parish Church.  All the recipes have been donated by people from the town; I am very grateful to whoever donated the recipe for this tea loaf!

On a Chicken Wing and a Prayer
"On a Chicken Wing and a Prayer" - Recipes from Thaxted Parish Church

The recipe is wonderfully simple.  To be honest I made it on a slight whim, having an urge to bake something and realising that all the ingredients were items I had - tea, mixed fruit, brown sugar, self-raising flour, an egg and cinnamon.

The fruit and sugar are soaked in tea overnight.  I think next time I make this I will be a bit braver and make the tea stronger.  I'm having friends over at the weekend, which I think will be the perfect excuse to make this delicious loaf for a second time.  I may even let them eat it before three o'clock tea time!

tea loaf
The finished loaf - already half gone!